Jobsscholar - Jobs, Jobs Hiring, Job Search Jobsscholar - Part Time Jobs, Jobs, Employment Agency Jobsscholar - Highest Paying Jobs, Job Application, Airport Jobs Jobsscholar - Government Jobs, Jobs Hiring, Find a Job Jobsscholar - Oil & Gas Jobs in Canada, Jobs, Internship

Tag Archives: US student visa rejection reasons

Most Common Reason Why Visa Applications to the United States Get Denied and How to Avoid This

Most Common Reason for Visa Denials and How to Avoid This: In this guide, we will learn the most common reason why visa applications to the United States get denied. Those applying for a U.S Visa, make sure you read this guide to the end.

Most Common Reason for U.S Visa Denials and How to Avoid This

Below is one of the most common reasons why visa applications to the United States get denied and tip to avoid it.

For many nonimmigrant visas to the U.S, such as for visitor visas, student visas and even many work visas that are nonimmigrant visas to the U.S, they have a requirement that the applicant for that visa has something called nonimmigrant intent.

What nonimmigrant intent means is that the applicant for that visa intends to return to their home country. They do not intend to remain in the United States permanently.

If an applicant for one of these non-immigrant visas does not satisfy the consular officer at the time of their visa appointment that they have nonimmigrant intent, then that consular officer, that immigration officer at the consulate will likely deny the visa application for something called 214(B).

214(B) essentially means that the visa applicant did not sufficiently convince the immigration officer that they possess nonimmigrant intent.

It could be that the immigration officer is not convinced that the applicant will return to their home country or potentially the immigration officer thinks that the applicant for the particular nonimmigrant visa will be remaining in the United States or something along those lines.

That’s a big picture overview of 214(B). It’s a highly common reason for nonimmigrant visa denials.

You might be wondering, how can I avoid a 214(B) denial?

The answer is that you want to show strong ties to your home country. What are some examples of strong ties to your home country?

Example 1: Is that you own property in your home country.

For example, you own a home or you own an investment property.

Example 2: Is that if you have family in your home country.

For example, if you have a spouse and children in your home country.

Example 3: Is if you have a business in your home country or you have a job in your home country.

In each of these scenarios or with each of these examples, you’re showing a link between yourself and your home country, where it would be unlikely for you to just leave whatever it is that you have going on in your home country and come to the United States permanently.

All of those examples a job, property, family, are things that tie you to your home country that make it less likely that you would give that up or leave that behind and move to the United States.

Again, one of the best ways to avoid a 214(B) denial is to demonstrate strong ties to your home country.

Visitor visas

Visitor visas regularly have denials under 214(B). How can you overcome these denials? Again, one way is to show strong ties to your home country.

In addition to showing strong ties to your home country, you also want to show a definitive purpose for coming to the United States.

What are some examples of a specific purpose for coming to the United States?

For example, if someone was coming to do a medical procedure, or someone was coming to attend a seminar of some kind, or a business conference, or to potentially negotiate a contract, or to go sightseeing. These are all specific reasons for coming to the United States.

The more that you can show the immigration officer that you have all these strong ties to your home country, and on top of that, you have a specific, limited purpose for coming to the United States, something that’s definite in duration or that’s limited in duration.

These two can work together to really create a strong impression before the consular officer that you’re not planning on coming to the United States to remain permanently.

You’re coming for a specific reason, and you certainly are going to return to your home country because of all those strong ties that you have there.

In summary

This guide talked about one of the most common reasons for nonimmigrant visa denials, 214(B) and some ways that can help strengthen your case to avoid denials under 214(B).

I hope you found this guide (Most Common Reason for Visa Denials and How to Avoid This) extremely helpful. Thank you so much for reading it.

If you know anybody that can benefit from this information, please make sure to share this guide with them. We’re all about empowering each other with knowledge.

DISCLAIMER: This post/guide and content is designed for general information only and is NOT legal advice. This site is not offering any legal advice. If you need legal advice, you should seek the advice of an attorney in your jurisdiction before taking any legal action.

The information presented in this post/guide should not be construed to be formal legal advice.

F1 Visa Tips – F1 Visa Interview Experience

You need to read this guide very well if you have your F1 Visa interview coming up soon. In this guide, you will learn the key points to pass your F1 Visa interview and get your visa approved.

7 critical tips that you must know before appearing for your F1 Visa interview

  1. Documents.

Make sure you have the following documents organized in your folder:

  • Passport
  • DS 160 Confirmation page
  • Application fee payment receipt
  • A physical photo which measures two inches by two inches, but only if the photo didn’t upload with your DS 160. This is highly uncommon.
  • Form I-20

Most applicants are single but if you are married and your spouse and children intend to live with you, bring their I-20.

  • Academic documents, including your transcripts, test scores, degrees and diplomas
  • Financial documents.

Also, carrying all the documents you have gathered during your university application process. Those will consist:

  • Letters of admission,
  • Scholarship or financial aid documents,
  • Student loan documents,
  • Bank statements,
  • Sponsorship letters, etc.

Additionally, carry all your current and past passports. If you have dual citizenship and have multiple active passports, you should along with them all.

Get familiar with your document folder. Organize it to quickly locate your documents. You should be able to find any requested document within 10 seconds. Keep practicing until you know your folder thoroughly.

  1. What to Wear

Wear business casuals that is appropriate for your country.

Dress for the weather as well. For example, wear breathable clothes, if it’s a hot day and you’re interviewing in summer. While the consulate or the embassy will have air conditioning, you may wait slightly before getting in.

Make sure your clothes are clean, wrinkle free, and well fitted.

Stick to safe colors. Stay away from overly bright colors and striking patterns.

  1. Time of Arrival

Your Visa appointment instructions may ask you to arrive 15 minutes before your appointment, make sure you arrive 30 minutes to an hour before your appointment time. This will give you a healthy buffer, if something goes wrong on the day of your interview.

You may be wondering where would you wait if you arrived early? Go to a local restaurant or coffee shop where you can wait before your interview. It should be very close to the consulate or embassy. It doesn’t take you more than five minutes to walk there.

Being nervous on the interview day is common. Use the time there to calm down and relax before your interview. It will also allow you to review the key points to interview better and get a positive outcome.

  1. Visa Officer’s Mindset

The visa officer is trying to evaluate two things;

  • You are genuinely a student and not trying to obtain a student visa for fraudulent purposes such as immigrating to the United States.
  • You intend to return to your home country after completing your studies.

You don’t have to do anything special to demonstrate that you are a genuine student. Simply answer the visa officers questions about your program, university and application process.

For the second part, that is, you intend to return to your home country after completing your studies. Ensure you include your future plans when answering these questions.

You should communicate how you will use your education to grow and succeed in your career when you return to your home country.

  1. Your Mindset and Your Approach

Your chances of success will come down to this one thing, how well can you tell your story? This will be dependent on two things, a natural conversation and your confidence level.

The visa officers place the most emphasis on having a natural conversation.

Many students approach the visa interview as a job interview or an interrogation. It is not, and there is no need to be nervous.

The visa officers want to know you and your goals. Focus on the conversation and keep things simple. Consider it as having a conversation with one of your elder relatives. You want to sound respectful, but not super formal.

Remember, the visa officers have to handle many requests during the day. They keep the interviews very short. Keep your answers concise and to the point. Don’t leave out the necessary details, but don’t overshare either.

Finally, your confidence level will depend on how relaxed you are. You’ve prepared well, so there is no need to be overly nervous. A little bit of anxiety is natural, and the visa officers are aware of that and don’t hold it against you.

A warm smile and a simple greeting such as “hello, how are you?” can get you a great start. From there on out, keep things conversational.

  1. Your Body Language

Your evaluation has already started when you’re in the building. The visa officer may glance at you while waiting in line behind the applicant they’re interviewing. Sometimes they may even see you before your number is called. Be mindful of your actions and body language.

While interviewing, maintain a good posture and make eye contact when you’re speaking. Smile when actively listening to the questions and answering them. Politely ask the visa officer to repeat the question if something is unclear.

Don’t let the visa officer’s questions or body language discourage you. For example, visa officers often look at their computers and type throughout the interview. Don’t let this bother you. It is pretty typical and you should continue to speak normally.

  1. Speak the truth and nothing but the truth

No matter what, make sure you are speaking the truth. For example, you may have some family in the U.S, and if you’re asked about it, stay calm and truthful.

Often the visa officers know this information and are just verifying it. The consequences of lying to the U.S government have a massive impact. You would undoubtedly be denied a visa and could be permanently banned from entering the U.S.

Those were the key points to be mindful of for your F1 visa interview.

DISCLAIMER: This post/guide and content is designed for general information only and is NOT legal advice. This site is not offering any legal advice. If you need legal advice, you should seek the advice of an attorney in your jurisdiction before taking any legal action.

The information presented in this post/guide should not be construed to be formal legal advice.

What To Expect After Filing F-1 OPT EAD Application with USCIS

Filing F-1 OPT EAD Application with USCIS: Every day there are thousands of applicants who are filing some type of immigration form to USCIS for the sake of claiming some type of US immigration benefit.

The challenge some of these applicants might have, especially when you’re a first time applicant is not known and what type of response that you’re going to get from USCIS, after submitting your immigration case.

In this article we will learn the different types of responses that you can expect from USCIS when tracking the status of your immigration case.

Filing F-1 OPT EAD Application with USCIS

Your immigration journey with USCIS begins at the moment you mail your application to USCIS. It’s usually recommend that when you mail your application to USCIS, you should request tracking information.

The reason you want to do this might be quite obvious because you want to monitor the status of the application. But it’s also very important to do this because in certain circumstances you might want your application to get to USCIS before a particular deadline.

A common scenario here tends to be the case of F1 students in the U.S who are applying for optional practical training with USCIS. Now, once you confirm the delivery of your immigration application to USCIS, it’s best that you save this confirmation of delivery in your records.

The reason why this is important is that just in case USCIS says that they did not receive the application, you can have an evidence to show that your application was submitted to USCIS.

In most cases, when you receive a confirmation of delivery from your mailing service provider, saying that your meal was received by USCIS, it’s more than likely that USCIS would have actually received the application.

It is quite rare to have circumstances where USCIS could lose your application after your mailing service provider has provided a confirmation of delivery of your application.

So it is safe to say that once you’ve received the confirmation of delivery from your million service provider, your waiting game with USCIS officially begins.

Form I-797 receipt notice

The very first response you’re likely to get from USA is a confirmation letter stating that your application for a particular immigration benefit was received. Now, this confirmation letter from USCIS is formally called a Form I-797 receipt notice, and it’s usually delivered by USPS regular mail.

When you get this receipt notice, the most important section of this notice is a receipt number that you can find on the top left corner of the form.

You are going to be using this receipt number moving forward to track the status of your immigration application with USCIS on the USCIS case status online, too.

On this receipt notice, you’re also going to find two important dates:

  • The first date is the notice date, which is essentially the day USCIS generated this letter to be mailed to you, and the second date is the received date, which is the day USCIS confirmed the receipt of your application.

Under normal circumstances, where USCIS might have a fairly typical processing time, it might take about four weeks for you to receive this receipt notice.

However, when USCIS has a severe backlog, it might take anywhere between six to twelve weeks to receive your receipt notice.

As a first time filer, your mileage might vary. For example, you might have someone who submitted the exact same immigration petition to USCIS that you’re submitting, and it takes them about four weeks to get a receipt notice while you have to wait longer than eight weeks to get your receipt notice.

Once you’ve got your receipt notice and you’ve found your receipt number, you can now start tracking the status of your immigration case using the USCIS website.

If you want to learn how to do that, checkout the post below that walks you through four best ways of tracking the status of your immigration case with USCIS.

Different types of USCIS immigration case updates you can expect after filing your F-1 OPT EAD application

Let’s go over the different types of case updates you might get when tracking the status of your immigration case with USCIS.

Once you’ve got your receipt number, if you enter this number into the USCIS case status quo, you’re going to see a case update that says “case was received.”

This is usually the first case updates on your immigration case. Now, one of the hang ups of the USCIS case status, too, that frustrates a lot of applicants is that the tool does not give you specific details on your immigration case, so it’s quite common to have a case update that says “your case was received” for several weeks until your immigration case is either approved or your immigration case is rejected or denied.

So if you keep checking the status of your immigration case on this tool, don’t be surprised to keep on seeing the update, “Case was received” for several weeks up until your application is approved or rejected.

Another case update you might get in this time period is the case update that says that your “case was transferred and the new office has jurisdiction.”

If you happen to get this case update, it simply means that USCIS has moved the application to another USCIS office simply because of a processing time issue. If this is the case, USCIS is also going to send you a letter in the mail explaining what new location your immigration application has been sent to and what you can expect to do if you have any further questions.

So from this point on, you’re only going to get the case update on the USCIS website if your application is either approved, rejected, denied, or if you receive a notice explaining that you need to provide further documents for your immigration application to be processed.

Using the example of someone who’s filed a Form I-765 for the Employment Authorization documents with USCIS. So if you file your form I-765 and you’ve checked your case status and it says that your case was received, the next steps you might get will be either if your case is rejected, denied, or approved.

Approved I-765

Let’s take the straightforward path that your application for your I-765 was approved. Well, what you can expect when you check your case status is that it’s obviously going to display that your case was approved, and within a few days you’re going to see another case update saying that a new card is being produced.

Once your case has been approved, you’re going to expect to receive another form I-797. Well, this time it’s going to be an approval notice explaining that your application for your employment authorization document (EAD) card was approved.

Unless it’s otherwise stated, this approval notice does not confer any immigration benefit to you.

So you would have to wait until you’ve received your employment authorization document card before you could begin working.

Card was delivered to me by the post office

Within a few days of USCIS producing your EAD card, you’re going to see a case update on the USCIS website saying that the card was mailed to you. And once this EAD card has been delivered to you, the case update is going to change to “the card was delivered to me by the post office.”

USCIS usually sends out EAD cards by USPS regular mail, so you should check your mailbox for your EAD card and also make sure to inspect this card closely, making sure that your biographical information, such as the spelling of your name and your date of birth, is correct on the card.

In the unfortunate circumstance that your application doesn’t go as smoothly from case was received to case was approved.

Some other types of case updates you might expect on the USCIS website or case updates like a request for additional evidence was mailed. Now, this is usually called an RFE

Once you respond to the request for evidence and USCIS receives a response, your case updates is going to change to response to USCIS request for evidence was received, and this is quite similar to the initial case updates that your case was received in the sense that you might have to wait for several weeks to receive another response from USCIS, which could be that your case was approved, rejected, or further evidence is needed.

Another case update you might get is an update that says that a notice explaining USCIS actions was mailed. Just like the case of the RFE, if you receive a case update like this, USCIS is going to send you a letter in the mail explaining the problems with your application, and will tell you what documents you need to provide so that your application will be processed.

A possible case update you could see on the USCIS website is the case update saying that your application was rejected.

This could be caused for a multitude of reasons. Sometimes it could be that you provided an application on a form that already expired, or sometimes it could be that you did not pay the right application fee.

For whatever the reason is in your rejection, USCIS is going to be providing a letter explaining the reasons why your application was rejected.

7 BIGGEST Mistakes International Students in the U.S. Make and How to Avoid Them

In this article, you will find out the 7 massive mistakes international students in the US make and what you can do to avoid them. So whether you are on an F1 visa or J1 visa, you should make it a point not to fall into any of these 7 traps.

7 Mistakes International Students in the U.S. Make and How to Avoid Them

  1. Not seeking financial assistance from your University whenever you’re going through a financial hardship.

As an international student, if you ever experience any kind of economic hardship during your stay in the US, such as the loss of a family member who provides financial support for your US education, or you incur a very high medical bill.

Or let’s say, for example, there’s some economic downturns going on in your home country where the currency is severely devalued relative to the dollar, then you want to make sure to seek financial assistance from the University.

International students in the US who are experiencing any form of financial hardship that’s out of their control can reach out to the international office and apply for what’s called a severe economic hardship program.

The University’s International Office will actually grant you work authorization, which you can use to work off campus. And in some cases you can actually be given a tuition assistance in the form of a scholarship or grant.

Something else you can do is to reach out to your school’s financial aid office and request a deferment payment plan for your tuition.

This tuition deferment payment plan would at least allow you to pay your tuition install-mentally over the course of the semester, and in some cases, you might actually be allowed to register for courses before paying your tuition in full.

As an international student facing any kind of economic hardship, the last thing you want to do is to be ideal while you wait to rectify your situation. If you don’t do this, then you risk getting dropped from classes and as an international incident, you are required to enroll full-time during a long semester in order to maintain your status.

  1. Forgetting to obtain a travel signature or endorsement from your school’s international office before you travel outside of the US.

This may not be a big deal if you realize early enough after leaving the States that you forgot to obtain a travel signature.

In this case, you can always reach out to your school’s international office and have them mail you form I-20 with a travel signature before you try to reenter the US. But what happens if you realize that you fail to obtain a travel signature at the point you’re trying to reenter the US? If this is the case, then you really increase the risk of getting denied entry into the US on your F1 visa.

So definitely make it part of your travel checklist every time you want to depart the US to obtain a travel signature from your school’s international office.

  1. Using your international passport as your only form of identification in the States.

Always carrying your international passport in the back pocket, you may end up losing your international passport. What you should do within the first few weeks in the US is to obtain a state identification card and use this as your primary identification documents. This way, you can safely leave your international passport at home.

If you lose your international passport, not only would you have to deal with the burden of going to your country’s embassy in the US and obtaining a replacement, but you would also have to travel back to your home country to apply for a new US visa, as US visas are never granted within the US.

  1. Failing to inform your school’s international office of a change in your residential address or a change in your employment, if you’re an OPT. This is strictly US regulation.

Anytime there’s a change in your address, you are required to report that change to your school’s international office within ten calendar days. The same is also true for international students who are participating in optional practical training (OPT).

If there is any change in your employment during your OPT, you are required to report that change to your school’s international office within ten calendar days.

  1. Remaining idle, if you happen to be unemployed while on OPT.

In the unfortunate circumstance that you happen to be unemployed while on OPT, what you want to do is to seek employment in the form of an unpaid internship or a volunteer opportunity.

  1. Not applying for your F1 post completion OPT on time.

Many F1 students make this a much bigger deal than it should be. Some F1 students think that it’s best to wait to get a job offer before they apply for their OPT, but this cannot be further from the truth.

Regardless of whether you have a job offer or not, it’s best to apply for your OPT as early as possible. This is because sometimes it can take as long as six months to obtain your OPT/EAD card from USCIS, and the last place you want to be as an international student in a competitive job market is to have a job offer but not be able to work simply because you haven’t received your EAD card yet.

Some employers may not be willing to wait for you to get your EAD card and might received a job offer.

  1. The worst mistake you can ever make as an international student and that’s engaging in unauthorized work.

During the course of your studies as an F1 international student, you can only work off campus if you have received CPT authorization or pre-completion opt authorization. And in the case of a J1 international student, you can only work off campus if you’ve received pre-completion academic training.

Any other form of off campus work that doesn’t fall into any of these three categories is considered unauthorized work and is ground for you violating your F1 or J1 status, and if your school’s international office finds out that you’ve worked off campus without obtaining any form of authorization, they will immediately terminate your F1 or J1 status, and you will be required to leave the US to obtain a new I-20 or DS 2019 before you can reenter the US.

That concludes for the 7 (seven) biggest mistake international students on F1 or J1 visas make in the US and what you can do to avoid them.

DISCLAIMER: This article/blog post and content is designed for general information only and is NOT legal advice. The information presented in this article should not be construed to be formal legal advice. If you need legal advice, you may contact a licensed attorney.

How to fill DS-160 form for U.S | Online Nonimmigrant Visa Application DS-160

Online Nonimmigrant Visa Application DS-160: The DS-160, Online Nonimmigrant Visa Application form, is for temporary travel to the United States, and for K (fiancé(e)) visas. Form DS-160 is submitted electronically to the Department of State website via the Internet.

Consular Officers use the information entered on the DS-160 to process the visa application, and combined with a personal interview, to determine an applicant’s eligibility for a nonimmigrant visa.

Visa applicants must submit a completed DS-160, Online Nonimmigrant Visa Application for all nonimmigrant visa categories, including applicants applying for K visas.

Where to Fill Form DS-160?

All applicants can access the Online Nonimmigrant Visa Application DS-160 form at the Consular Electronic Application Center website.

Sample Form DS-160

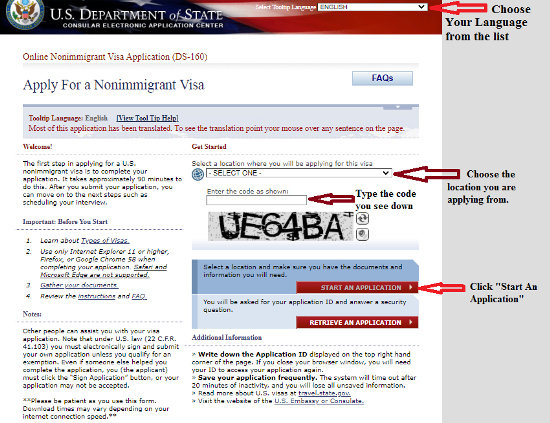
Below is a sample for the DS-160 form.

Online Nonimmigrant Visa Application DS-160

DS-160 Form Filling Instructions

Completing a DS-160 online application form is not a hard task. You should follow a few simple steps and pay attention to your answers, so you fill the DS-160 form online correctly, without making any mistakes.

Log in

When you log in, start completing the form. Make sure you have a strong internet connection and enough time, before you start. Do not complete the DS-160 electronic form in a hurry, as you may miss stuff. You will have several questions to answer, so take your time.

First, you must select the location where you will apply for your visa. Then, click on “Start an Application” button if this is your first application.

Complete the security question

You need to complete this part to get a unique application ID and for online security reasons. Choose a security question and remember the answer that you provide. You may need it for your next log in.

Start answering the questions

After completing the first two pages of the application form, you will then start to answer questions regarding your application. The questions are grouped into four categories:

  • Personal questions.
  • Family information.
  • Work/education/training information.
  • Security-related questions.

Following, find all of the DS 160 application form questions:

Personal questions

  • Name & surname.
  • Full name in native alphabet.
  • Marital Status.
  • Date and place of birth.
  • Country of origin.
  • Do you have any other nationality other than the one indicated?
  • Are you a permanent resident in any other country aside from your country of origin?
  • Home Address.
  • Phone number – work and personal.
  • Email address.
  • Passport information: Number, date of place of issuance, date of expiration.
  • Purpose of the trip to the U.S (you may have to specify that).
  • Do you have specific travel plans? If yes you will need to give the intended date of arrival, length and address where you will stay, and whether you will be accompanied by someone.
  • Information on previous trips to the U.S: If you have ever been to the U.S, ever held a U.S visa, or were rejected from getting a visa or refused entry to the U.S.
  • U.S point of information, if applicable – their relationship to you and home address.

Family information

  • Parents’ given full names.
  • Do you have any relatives in the U.S?
  • Your spouse’s name, date and place of birth.

Work/education/training information

  • Primary occupation, address, start date, monthly salary in local currency, and briefly describe your duties
  • Were you previously employed?
  • Have you attended any education institutions at a secondary level or above?
  • Which languages do you speak?
  • Have you traveled within the last five years?
  • Have you belonged to, contributed to or worked for any professional, social or charitable organization?
  • Do you have any specialized skills or training, such as firearms, explosives, nuclear, biological or chemical experience?
  • Have you ever served in the military?
  • Have you ever served in, been a member of or been involved with a paramilitary unit, vigilante unit, rebel group, guerrilla group or insurgent organization?

Security-related questions

  • Do you have a communicable disease of public health significance? Communicable diseases of public significance include: chancroid, gonorrhea, granuloma inguinale, infectious leprosy, lymphogranuloma venereum, infectious stage syphilis, active tuberculosis, and others diseases as determined by the Department of Health and Human Services.
  • Do you have a mental or physical disorder that poses or is likely to pose a threat to the safety or welfare of yourself or others?
  • Are you or have you ever been a drug abuser or addict?
  • Have you ever been arrested or convicted for any offense or crime, even though you are subject to a pardon, amnesty, or other similar action? This includes all arrests or detentions, including those at the border and by Customs and Border Patrol.
  • Have you ever violated, or engaged in a conspiracy to violate, any law relating to controlled substances?
  • Are you coming to the United States to engage in prostitution or unlawful commercialized vice, or have you been engaged in prostitution or procuring prostitutes within the past 10 years?
  • Have you ever been involved in, or do you seek to engage in, money laundering?
  • Have you ever committed or conspired to commit a human trafficking offense in the United States or outside the United States?
  • Have you ever knowingly aided, abetted, assisted, or colluded with an individual who has committed or conspired to commit a severe human trafficking offense in the United States or outside the United States?
  • Are you the spouse, son, or daughter of an individual who has committed or conspired to commit a human trafficking offense in the United States or outside the United States, and have you, within the last five years, knowingly benefited from the trafficking activities?
  • Are you the spouse, son, or daughter of an individual who has been identified by the President of the United States as person who plays a significant role in a severe form of trafficking in persons, and have you, within the last five years, knowingly benefited from the trafficking activities?
  • Are you the spouse, son, or daughter of an individual who has violated any controlled substance trafficking law, and have knowingly benefited from the trafficking activities in the past five years?
  • Do you seek to engage in espionage, sabotage, export control violations, or any other illegal activity while in the United States?
  • Do you seek to engage in terrorist activities while in the United States, or have you ever engaged in terrorist activities?
  • Have you ever, or do you intend, to provide financial assistance or other support to terrorists or terrorist organizations?
  • Are you a member or representative of a terrorist organization?
  • Have you ever ordered, incited, committed, assisted, or otherwise participated in genocide?
  • Have you ever committed, ordered, incited, assisted, or otherwise participated in torture?
  • Have you committed, ordered, incited, assisted, or otherwise participated in extrajudicial killings, political killings, or other acts of violence?
  • Have you ever engaged in the recruitment or the use of child soldiers?
  • Have you, while serving as a government official, been responsible for or directly carried out, at any time, particularly severe violations of religious freedom?
  • Have you ever been directly involved in the establishment or enforcement of population controls: forcing a woman to undergo an abortion against her free choice or a man or a woman to undergo sterilization against his or her free will?
  • Have you ever been directly involved in the coercive transplantation of human organs or bodily tissue?
  • Have you ever sought to obtain or assist others to obtain a visa, entry into the United States, or any other United States immigration benefit by fraud, willful misrepresentation, or other unlawful means?
  • Have you ever withheld custody of a U.S. citizen child outside the United States from a person granted legal custody by a U.S. court?
  • Have you voted in the United States in violation of any law or regulation?
  • Have you ever renounced United States citizenship for the purpose of avoiding taxation?

Upload DS-160 Form Photo

At the very end of the DS-160 form, you will need to upload a digital photo of your face. The photo should be taken within the last 6 months, and meet the other US Visa photo requirements and specifications.

Note that to be able to upload the photo, it must be 240kb or less. After you upload it, if the photo meets the guidelines, you will see a green tick and the confirmation “Photo passed quality standards”.

Submit the Form

After you successfully upload the photo, you will receive the location where you should submit your application for a U.S nonimmigrant visa. Memorize the location, or even better write it somewhere.

You will then need to electronically sign the application. You can do so by clicking on the “Sign and Submit Application”.

Thus, you will successfully complete the first step of your application for a U.S nonimmigrant visa.

Print DS-160 Barcode Page

Once you are done, you will be presented with a confirmation page, which you need to print, and bring with you on the day of your U.S visa interview. Without DS-160 form confirmation you will be unable to attend your interview.

Documents You Need to Complete DS-160 Electronic Form

You will have to look at these documents when filling in the form:

  • Your valid passport.
  • Travel itinerary.
  • Dates of every international trip you have made in your last five years, including to the U.S
  • Information on your current and previous education and work history.

Additionally, when applying for some particular U.S nonimmigrant visas, you may need to keep close to you some additional documents. These are:

  • Students and Exchange Visitors (F, J, and M) – you will need your SEVIS ID and the address of the school/program at which you intend to study. This information should be on your I-20 or DS-2019 form.
  • Petition-based Temporary Workers (H-1B, H-2, H-3, CW1, L, O, P, R, E2C) – You will need a copy of your I-129 form.
  • Other Temporary Workers – you will need to have ready information on your future employer, including their address.

DS-160 Form Validity

The DS 160 form is valid for 30 days from the day you start completing it. Therefore, if you start applying on January 1, the DS 160 form expiration date will be by January 31. Make sure you complete the form on time, or else you will need to start it from the beginning.

DS-160 Form Visa Fee

There is no DS-160 form fee payment. However, you will need to pay the fee for the U.S visa you are applying for and that will be done at your embassy, were they will explain in details for you.

What is DS-160 confirmation number?

The DS-160 confirmation number is the number you receive once you complete the form, sign and submit it. The number serves as a confirmation that you have completed this step.

Can DS-160 form be edited after submission?

DS-160 form correction after submission is not possible once you have signed and submitted it. Yet, you can make a DS-160 form edit in two ways.

  • If you submitted the form within the last 30 days you can just retrieve your application at the Consular Electronic Application Center system and edit it.
  • The other way is two fill in a completely new application. You must bring confirmation pages from both the original and revised Form DS-160 on the day of your appointment.

How to retrieve DS-160 form after submission?

You will be able to retrieve your DS-160 form visa application within 30 days since the day you signed and submitted your application. Follow the steps below:

  • Log into the Consular Electronic Application Center system.
  • Enter the application identification number.
  • Select “Retrieve an Application”.
  • Create a new application, which will cause the entire prior application to appear.
  • Edit the information as needed.
  • Re-submit the application.

Should I print the whole application?

No, you do not need to print the whole application form. You only need to print the DS 160 Form confirmation page, without which, you would be unable to submit your application file or attend the visa interview.

In summary

The Form DS-160 is the electronic (online) application form for the U.S nonimmigrant visa. It is a fully online form, which must be completed by every applicant wishing to get a nonimmigrant visa for the U.S, including applicants applying for K visas.

The form contains questions on your personal information, contact details, passport and travel information, previous trips to the United States (if any), family information as well as questions about your education and work experience.

In addition, the U.S visa application DS-160 form also asks security-related questions on your background and asks you to upload your face image.

Disclaimer: This site is not owned by any U.S Government Agency or an Immigration attorney. The contents in the site is for informational purpose only, collected from various public domains. You may need to contact an Immigration Attorney for your specific immigration needs.

Content sources: Travel.State.Gov and visaguide.world

I hope this article has been helpful to you, let us know in the comments down below.

Useful tips to Avoid being Rejected for the USA Student Visa

This brilliant and educative article will focus mainly on U.S student visa rejection reasons, how to apply for the right study visa for USA, how to handle the U.S student visa interview and common questions you should expect during the visa interview.

USA Student Visa

The moment you were waiting for has come and you got admitted to an American College or University. You’re gloating and excited like never before and you should be. American universities only accept the best candidates, so this truly is a great accomplishment.

Your life is about to change significantly, not just in terms of your higher education, but also your entire future.

Studying in the USA will highly impact your career as well. So you should benefit from this amazing opportunity as much as you can.

There is one small step left, you need to take the Student visa interview. You’ve probably heard numerous stories about how daunting the whole visa application process can be. U.S student visa rejection reasons.

Worry no more! Nothing is as terrible as it sounds, not even the visa interview. Read further to be fully prepared and find out some useful tips for avoiding visa rejection for studying in the U.S.

Apply for the right Study Visa for USA

There are two student visa categories for people who want to study in the USA:

  • The F-1 student visa, which is for academic studies;
  • The M-1 visa is for nonacademic or vocational studies.

Try to apply for your visa three months before your plans travel to the U.S. This will give you enough time in case there are delays at the embassy or wish to make an appeal in case your visa is denied.

Find out more about the required documents and the conditions you have to meet to apply for the US student visa.

How to Handle the U.S Student Visa Interview

The student visa application for the United States is comparable to a job interview. For international students, the simple idea of entering the embassy and having a discussion with a visa officer will seem as an intimidating experience.

Below are six key points to consider in order to feel more comfortable during your visa interview.

  • Dress professionally

The first impression will be in regards to your outfit, so be sure to wear a business attire. A visa interview is a formal event and you should treat it accordingly.

  • Keep answers to the point

Give quick and complete information when you answer the questions of the visa officer. Proving you have good English skills during the interview is important and would make a good impression.

However, if you are unable to answer some questions in English, you can ask for an interpreter. This will not affect the outcome of your interview, as many students choose specifically to study in the U.S. To learn the English language.

  • Be honest

Do not give vague answers. Don’t memorize a speech and do not make overstatements about how wonderful the United States is and how you have always dreamed to see this country.

It is a good idea to prepare a little before the interview, but the visa officer will simply focus on the general idea of how it would be in your benefit to study at an American College or University and in the benefit of the American institution to have you as their student.

  • Name the school and location

State exactly where you will study and for what career your studies in the USA prepare you for. Try to explain in a few details why you chose the specific school and give information about where you will live.

  • Prove your commitment

In case your grades are not exactly high, you will be required to explain how you will succeed as a student in the U.S. It would be a good idea to have prepared a letter from a school teacher explaining how the study program you applied to make sense.

  • Adapt to your interviewer

Try to figure out if the interviewer is in a hurry or not; if so, keep your answers short. On the other hand, if the officer seems to enjoy the discussion, you can extend your speech a little, but don’t be more specific than needed.

Common questions you should expect during the visa interview

  • How many universities did you apply to?
  • To which universities did you get admitted?
  • Why do you want to study in the USA?
  • Can you tell me some details about your chosen University?
  • What is your GPA percentage?
  • Have you been to the US before?
  • What are your plans after graduation?
  • Did you receive any scholarships?
  • Who will finance your studies?
  • Do you have any relatives in the USA?

U.S student visa rejection reasons

Below are some useful reasons why your USA visa application might get rejected:

  1. If you show your intention to remain in the U.S after you graduate

This is the most common reason that makes visa officers reject a student’s F-1 visa and the most important aspect they follow during the visa interview. Without any exaggeration, try to make it as clear as possible that your only plan is to study in the States and that you will return home after you graduate.

  1. If you cannot show financial ability to support yourself

You have to prove that you have the finances to live in the U.S. If you don’t, you’ll need to show your willingness to take a job to fund your studies, and that contradicts the purpose of a student visa.

  1. If your University/degree looks suspicious

If the visa officer considers that the University you applied to may not be accredited or sees other aspects that will make him/her wonder of the credibility of your chosen course or degree, this could be a reason to reject your student visa application.

Your school must be approved by the Student and Exchange Visitors Program, Immigration and Customs Enforcement.

  1. If you have members of your family already living in the U.S

This raises the suspicion that either you apply for a student visa under a false pretext or your real plan is to emigrate or that you will remain in the U.S after you finish your studies and pursue a career with no intention of returning home.

In summary

Staying positive and confident is crucial during the visa interview. Remember to stay positive the whole time during your interview. You might be surprised by a question or don’t exactly give the answers as you planned or thought you would.

This is completely normal, considering most candidates are more or less nervous during this kind of interview.

So try to keep a smile no matter what and remember that showing you are a confident person is a key element in this case.

I hope this article has been helpful to you.

Disclaimer: This site is not owned by any U.S Government Agency or an Immigration attorney. The contents in the site is for informational purpose only, collected from various public domains. You may need to contact an Immigration Attorney for your specific immigration needs.

error: Content is protected !!