Jobsscholar - Jobs, Jobs Hiring, Job Search Jobsscholar - Part Time Jobs, Jobs, Employment Agency Jobsscholar - Highest Paying Jobs, Job Application, Airport Jobs Jobsscholar - Government Jobs, Jobs Hiring, Find a Job Jobsscholar - Oil & Gas Jobs in Canada, Jobs, Internship

Scholars Hub

Key Documents Needed for Scholarship Applications and their Samples

Documents needed for scholarship applications: Scholarship requirements can vary, but there are common documents that many institutions and organizations frequently request. The following documents are required for Scholarship applications to both Graduate and Undergraduate programs. Here’s a concise overview of each, with space for samples:

Documents Needed for Scholarship Applications

1️. Passport: Your official identification for international applications.

2️. CV (Curriculum Vitae): A detailed account of your academic and professional history.

Find samples here and how prepare an academic CV.

3️. Educational Certificates: This could be your Degree, BSc, HND, OND, High School, O’level, or NCE certificate, depending on the scholarship’s specifications/level of study.

4️. Academic Transcript: Your official academic record from your institution.

See samples from University of Bath:

5️. Statement of Intent/Letter of Motivation/SOP: A personal essay detailing your aspirations and reasons for applying.

Several samples: See How to write Statement of Purpose (SOP) with Samples, & Format

6️. English Proficiency Letter: A certification that proves your proficiency in the English language, though sometimes it’s optional. Like IELTS and TOEFL.

However, if you graduated from universities where English is the medium of instruction, an attestation letter from the Registrar or HOD might help.

7️. Recommendation Letters or Referee Contacts: Letters from professionals or academics vouching for your capabilities and character.

Samples:

8️. Research Statement or Proposal: Particularly important for PhD applications, detailing your intended research scope and importance.

It’s important to note that not all scholarships require every document listed above. Sometimes, especially for lab-based PhD programs, starting with just your academic transcript can be enough to get the ball rolling. Always tailor your application according to the specific requirements of each scholarship opportunity. Best of luck in your pursuits!

Here are the top 20 PhD scholarships with their respective website links:

1. Fulbright Program: https://foreign.fulbrightonline.org/

2. Chevening Scholarships: https://www.chevening.org/

3. Erasmus Mundus Joint Doctorates: https://www.em-a.eu/erasmus-mundus

4. Gates Cambridge Scholarship: https://www.gatescambridge.org/programme/the-scholarship/

5. Rhodes Scholarship: https://www.rhodeshouse.ox.ac.uk/scholarships/the-rhodes-scholarship/

6. Marie Skłodowska-Curie Actions (MSCA): https://marie-sklodowska-curie-actions.ec.europa.eu/

7. Commonwealth Scholarship and Fellowship Plan: https://study-uk.britishcouncil.org/

8. DAAD Scholarships: https://www.daad.de/en/studying-in-germany/scholarships/daad-scholarships/

9. Vanier Canada Graduate Scholarships: https://vanier.gc.ca/en/home-accueil.html

10. Australia Awards Scholarships: https://scholarships.org.au/scholarships/

11. Schwarzman Scholars Program: https://www.schwarzmanscholars.org/admissions/

12. Swiss Government Excellence Scholarships: https://www.sbfi.admin.ch/sbfi/en/home.html

13. Chinese Government Scholarships: https://admission.cuhk.edu.hk/

14. Endeavour Postgraduate Awards: https://www.strath.ac.uk/

15. Japanese Government Scholarships: https://www.studyinjapan.go.jp/en/planning/scholarship/

16. Ford Foundation International Fellowships Program: https://www.fordfoundation.org/

17. Soros Fellowships for New Americans: https://www.pdsoros.org/

18. Korean Government Scholarship Program: https://gksscholarship.com/

19. Netherlands Government Scholarship Program: https://www.uaf.nl/

20. Erasmus+ Joint Doctorate Program: https://commission.europa.eu/index_en

These are 20 Scholarship Opportunities Websites that Can Support your Research Journey. Before applying, always ensure you cross-check each scholarship’s unique requirements. Best of luck with your applications!

DISCLAIMER: This post and content is designed for general information only and is NOT legal advice. This site is not offering any scholarships and is not the official site for scholarships. The information presented in this post should not be construed to be formal legal advice. Please ignore any sites, organization or anyone asking or demanding any form of payment from you, for jobs or visa preparations.

2024 Ontario Internship Program in Canada | Eligibility and Requirements

Applications for the 2024 Ontario Internship Program will be accepted between December, 2023 and January, 2024. The only way to apply is through online application system during the application period. To be eligible for consideration, an application must be “Submitted” before the deadline.

2024 Ontario Internship Program Deadline Dates and Time

The application deadline is Wednesday, January 31, 2024, before 12:00 noon Eastern Standard Time.

Ontario is a province in east-central Canada. Ontario Internship Programs (OIP) invest in committed, talented graduates seeking a great opportunity to start and accelerate their careers. Internship placements are available across the province in various ministries and agencies. Candidates can indicate their preferred work locations on their application form. The OIP cannot guarantee the availability of relevant work placements in all cities.

The OIP offers a one-year full-time paid developmental opportunity. The OIP receives approximately 2500 applications each year, hires approximately 100 interns annually. There is no age limit to apply to the OIP program. Applications are submitted through online system.

Interns do not choose their own job placement or ministry. The OIP assigns interns to ministry placements based on a number of factors, including organizational business needs, available focus area assignments and ministry business priorities, as well as interns’ skills, experience and geographic preference.

2024 Ontario Internship Program Eligibility and Requirements

At the time of an employment offer, candidates to the Ontario Internship Program (OIP) must satisfy the following requirements:

  • You have graduated or will complete the requirements to graduate between May 2022 and August 2024 from a recognized or legally authorized college or university with:
  1. A degree
  2. A diploma
  3. A post-graduate certificate which requires a previous degree or diploma
  • You are legally entitled to work in Canada
  • You must be living in the province of Ontario during the term of employment.
  • You are not currently an OIP intern and have not been an OIP intern in the past.
  • Internships are open to persons with disabilities who have graduated from an eligible post-secondary program in the last five years (May 2019-August 2024).
  • Internships are open to all Indigenous applicants who have graduated from an eligible post-secondary program in the last five years (May 2019-August 2024).
  • Internships are open to persons who self-identify as Black and who have graduated from an eligible post-secondary program in the last five years (May 2019-August 2024).
  • Internships are open to all Bilingual French-English applicants who have graduated from an eligible post-secondary program in the last five years (May 2019-August 2024).
  • There is no age limit to apply to the OIP program.

Find out more about Eligibility Requirements here

2024 Ontario Internship Program Application Procedures

Applications are submitted through online system.

APPLY NOW

If you are unable to submit electronically and require accommodation to complete the OIP application form, contact them at contact.oip@ontario.ca.

Visit Ontario Internship Program Application official webpage for more details.

List Of Scholarships For African Students That Will Close February 2024, Apply Now!

Every year, applications open for undergraduate, masters, and doctoral funding opportunities for African students to study abroad. These scholarships are offered by institutions and organizations in Africa and across the world. Select and start applying for scholarships for African students:

Below are top scholarships that are currently open for African students with varying closing dates in February 2024.

Holland Government Scholarship for International Students – Bachelors & Masters

Apply now for the Holland Government Scholarship! The Netherlands Government is offering the Holland Scholarship for International students to study for Undergraduate and Master’s programme!

Scholarship Location: Netherlands

Application Deadline: 1st February

TU Delft Summer School Scholarship for Students & Teachers in Developing Countries

The Summer School Planning and Design with Water for Sustainability takes place every JULY at the Department of Urbanism of the Faculty of Architecture and the Built Environment of the Delft University of Technology (TU Delft).

The scholarships cover travel costs, accommodation and daily costs during the Summer School (meals and transportation).

The Summer School offers three types of scholarships:

  • SUB-SAHARAN AFRICA SCHOLARSHIP
  • SPECIAL FEES FOR TRANSITION ECONOMIES AND CONFLICT ZONES
  • YOUNG AFRICAN TEACHERS SCHOLARSHIP

Scholarship Location: Netherlands

Application Deadline: 1st February

Iso Lomso Fully-funded Fellowships for Early Career African Researchers

Iso Lomso Fellowships provide an exceptional early career opportunity for Africa’s brightest minds in academia. Iso Lomso means ‘the eye of tomorrow’ in isiXhosa: seeing towards the future, laying the foundations for tomorrow.

Application Deadline: 15th February

Hertie School of Governance Doctoral Programme for International Students (Tuition free + Stipend)

The Hertie School of Governance Doctoral Programme in Governance is open to 10 candidates with an exceptionally strong master’s degree (or equivalent) in economics, law, political science, sociology, public administration, Management, or related fields.

Scholarship Location: Germany

Application Deadline: 1st February

University of Konstanz ZUKOnnect Fellowships for Early-career Researchers from Developing Countries (Fully-funded)

The Zukunftskolleg has just launched a new call for “ZUKOnnect Fellowships for Scholars from Africa, Asia and Latin America.

Scholarship Location: Germany

Application Deadline: 15th February

International Monetary Fund (IMF) Fund Internship Program for International Students

Are you within a year or two of completing your PhD in economics or a related field or completing a Master’s degree in economics? The International Monetary Fund’s (IMF) Internship Program (FIP) may be the right opportunity for you!

Application Deadline: 15th February

Islamic Development Bank (IsDB) Scholarships for Students in Muslim Communities (Undergraduate, Masters, PhD) (OPENING SOON)

The Programme covers all relevant expenses during students’ study period, including tuition fees, health and living costs as determined by the IsDB.

Application Deadline: 28th February

Yale Fox International Fellowships for Bachelors, Masters and Doctoral Students

Yale University jointly pursues these aims with 19 of the world’s leading universities in Africa, Asia, Australia, Europe, the Middle East, and the Americas.

Scholarship Location: United States

Application Deadline: 1st February

York University international Scholarships

York University is offering full-tuition scholarships to outstanding international students wishing to undertake Bachelor studies at the University.

Scholarship Location: Canada

Application Deadline: 1st February

Italy: Cattolica Africa Scholarship Program for African Masters Students

Università Cattolica del Sacro Cuore, as part of its mission to foster relationships with developing countries, has developed a special program for students from the African continent. This program will enable students to study for undergraduate and postgraduate degree programs taught in English at UCSC’s Milan, Piacenza and Cremona campuses.

Scholarship Location: Italy

Application Deadline: 16th February.

Leiden University Excellence Masters Scholarship Programme (LExS) – Netherland

The Leiden University Excellence Scholarship programme (LExS) is offered to excellent Non-EU/EEA students enrolling in a Leiden University master’s degree programme and for excellent students from all nationalities enrolling in a Master of Law Advanced Programme or MSc in International Relations and Diplomacy.

Scholarship Location: Netherlands

Application Deadline: 1st February.

Yale Young African Scholars (YYAS) Program for African Secondary School Students

The Yale Young African Scholars Program (YYAS) is a high-intensity academic and leadership program designed for African secondary school students who have the talent, drive, energy, and ideas to make meaningful impacts as young leaders, even before they begin their university studies.

Application Deadline: 25th January

Swedish Institute Scholarships for Global Professionals for Developing Countries

The Swedish Institute Study Scholarships (SISS) are awarded to students from selected countries for full-time master’s level studies in Sweden starting in the autumn semester. The scholarships cover both living costs and tuition fees.

Scholarship Location: Sweden

Application Deadline: February

Study in Belgium: VLIR-UOS Masters & Training Scholarships in Belgium for African/Developing Countries

VLIR-UOS offers full Masters & training Scholarships in Belgium for students from Developing countries – half of this scholarship will be offered to African students and preference will be given for Women. The eligible training or Masters programmes are taught in English.

Scholarship Location: Belgium

Application Deadline: Jan-March

France Bans Students, Others From Bringing Their Families To France

France bans Students: The French parliament has passed a law restraining Nigerian students and others from bringing their families to the country.

According to a report, the law was backed by both President Emmanuel Macron’s centrist Renaissance party and Deputy of the French National Assembly, Marine Le Pen’s far-right National Rally.

A previous draft was rejected by parliament last week when the National Rally, as well as the left, voted against it. In response, the government redrafted the bill, making some of its provisions tougher.

The new toughening immigration policy makes it more difficult for migrants to bring family members to France and delays their access to welfare benefits.

It also bans detaining minors in detention centers while leaders of a third of French regions said they would not comply with certain measures in the law.

A controversial provision discriminates between citizens and migrants, even those living in the country legally, in determining eligibility for benefits.

The tougher version appealed to right-wing parties, who backed it on Monday.

Ms Le Pen welcomed the amended bill, calling it an “ideological victory” for the far-right.

“This is our bill,” said Eric Ciotti, the leader of the right-wing Republican party. He called it “firm and courageous”.

But left-wingers said Mr Macron was enabling the far-right. “History will remember those who betrayed their convictions,” Socialist party leader Olivier Faure said.

32 of France’s 101 departments, including Paris, said they would refuse to implement the provisions of the law on benefits for non-citizens.

The French vote came hours before an EU agreement to reform the asylum system across the bloc’s 27 member states.

The new pact, agreed by EU governments and European Parliament members, includes creating border detention centres and enabling the quicker deportation of rejected asylum seekers.

Hailed as a landmark agreement by Parliament President Roberta Metsola, the new system allows asylum seekers to be relocated from southern member states, which have the highest numbers of arrivals, to other countries.

It still has to be formally approved by the Parliament and member states.

The new French legislation exposed divisions within the governing alliance.

27 MPs voted against while 32 abstained – almost a quarter of pro-Macron MPs.

Health Minister Aurélien Rousseau, who was a member of the Communist Party in his youth, stepped down in protest at the immigration law.

“Some measures in the bill make me very uncomfortable,” said Yaël Braun-Pivet, the president of the lower house of parliament and a member of Mr Macron’s party.

The bill would have passed if Ms. Le Pen’s party had abstained, though not if it had voted against it. The government pointed to the size of its majority to argue that it did not depend on National Rally votes.

Speaking after the vote, the prime minister accepted some measures in the law might not be constitutional.

“We will ask the Constitutional Council,” she told French radio, referring to a top court that upholds the constitution’s principles.

Source: Punchng

How to get your site approved for Google Adsense

Getting your website approved for Google AdSense requires a well-structured and content-rich site. Here are some unique post ideas and tips to help improve your site’s chances of getting approved:

  1. High-Quality About Page:

Create a well-written “About Us” page that describes your website’s purpose, content, and your team (if applicable). This page builds trust with Google and visitors.

  1. Privacy Policy and Terms of Service:

Include a clear and comprehensive privacy policy and terms of service pages. This is a requirement for AdSense approval.

  1. Unique and Valuable Content:

Create original, high-quality, and informative content that is relevant to your target audience.

  1. SEO-Optimized Blog Posts:

Write SEO-friendly blog posts that target relevant keywords and phrases. Optimize your site’s meta tags and headings.

  1. Diverse Content Types:

Include a variety of content types such as articles, videos, images, infographics, and more to engage a broader audience.

  1. Consistent Posting Schedule:

Maintain a regular posting schedule to show that your site is actively updated.

  1. Mobile-Friendly Design:

Ensure your website is mobile-responsive and loads quickly on all devices.

  1. User-Friendly Navigation:

Create a clear and easy-to-navigate site structure with an intuitive menu.

  1. Minimal Ads:

If you have ads on your site before applying for AdSense, ensure they don’t overwhelm or disrupt the user experience.

  1. Clear Contact Information:

Provide a “Contact Us” page with a visible email address for inquiries and support.

  1. Social Media Presence:

Promote your content on social media platforms to build a following and increase traffic.

  1. Engagement:

Encourage user engagement through comments and social sharing.

  1. Niche-Specific Posts:

Create content that specifically caters to your niche audience, demonstrating your expertise in your field.

  1. Remove Broken Links and Errors:

Regularly check and fix broken links and site errors.

  1. Professional Design:

Ensure your website has a professional and clean design.

  1. Content Ownership:

Make sure all content is original and not copied from other sources.

  1. Legal Compliance:

Comply with all relevant laws and regulations.

  1. Improve Page Speed:

Optimize your site’s loading speed to enhance the user experience.

Remember that Google AdSense has specific guidelines and policies, so make sure your website adheres to these standards. It may take some time for Google to review your site, so be patient and keep working on improving your content and website’s quality. That’s tips on approved site for Google Adsense.

Canada: University Of Toronto MasterCard Foundation Scholarship + Internship 2024/2025 For African Students

The University of Toronto (Canada) MasterCard Foundation Scholars Programme is offering Undergraduate scholarship to sub-Saharan African Students for 2024/2025 academic session.

Application Deadline: 10th December 2023 (Deadline Varies across different courses)

Offered annually? Yes

Eligible Field of Study: First-entry undergraduate programs in either the Faculty of Arts and Science or the Faculty of Applied Science and Engineering

About University of Toronto MasterCard Foundation Scholarship

If you are a student from Sub-Saharan Africa who has demonstrated your academic talent, are personally committed to giving back to your country, yet face significant economic barriers, then you are advised to apply to The MasterCard Foundation Scholars Programme.

The University of Toronto MasterCard Foundation offers The MasterCard Foundation Scholars Programme at the University of Toronto to develop Africa’s next generation of leaders.

Thanks to the Foundation’s visionary support, U of T can now provide 67 African students with one of the world’s top-ranked educations, in one of the world’s most multi-cultural cities. The MasterCard Foundation Scholars Programme opens up boundless opportunities for young Africans from economically disadvantaged communities, but with academic talent, potential to lead, and motivation to make a difference. As U of T graduates and global citizens, they will return to Africa with the tools to change lives within their communities and across borders.

In 2024/2025 session, applications opens to one of the following areas:

To apply for the Doctorate in Public Health program, please find the application form here.

The University of Toronto (U of T) is collaborating with eight leading African universities to support their efforts to train and prepare young professionals for the meaningful work of growing African health sectors, with an emphasis on employment opportunities for women.

The African Higher Education Health Collaborative partners include:

Offered Since:  2013/2014 academic year

Type: Undergraduate Scholarships for African students

Selection Criteria and Eligibility: The Toronto MasterCard Foundation Scholars Programme is open to you if you are a resident and citizen of a Sub-Saharan Africa country. You must be a first-time applicant to the University of Toronto who has not yet begun university study elsewhere. If you are a transfer student, you are not eligible for the Program.

In order to be eligible for the Toronto MasterCard Foundation Scholars Programme, you must:

  • be a resident and a graduating high school student of a country within Sub-Saharan Africa;
  • demonstrate financial need correspondent to that of the lowest two quintiles of your country;
  • have very strong academic results within your school system;
  • have a record of leadership and extracurricular involvement;
  • maintain a strong desire to return to Africa to assist and work towards enhanced regional socioeconomic development;
  • be graduating from a recognized secondary school, or have completed the necessary academic requirements; and
  • fulfill the necessary English requirements (dependent on country);

Please note that both academic and English requirements differ based on the country and educational system you are coming from.

Number of Scholarships: Numerous

Value of University of Toronto MasterCard Foundation Scholarship:

  • If selected, you will receive a scholarship equivalent to the costs related to attaining a Bachelor’s degree, including travel, tuition, textbooks, housing, food, and living expenses.
  • You will also receive financial, academic, social, and post-graduation support which will enable you to build experiences and competencies critical for academic success.

University Of Toronto MasterCard Foundation Internships: The program includes two unpaid internships.

  • The first will take place in the Toronto area for three months during your second summer to provide local practical work experience and skills.
  • The second internship will take place in Africa during your third summer.

There will be funding available to help you with the cost of a passport. If you do not own a passport, the program will aid in passport applications and related costs.

Duration of Scholarship: for a four-year undergraduate degree

Eligible Countries: Sub-Saharan Africa

To be taken at (country): University of Toronto. Canada

How to Apply for University of Toronto MasterCard Foundation Scholarship

To apply for the scholarship and for admission, you must submit an online application.

They are pleased to announce the start of the 2024-2025 Mastercard Foundation graduate scholarship recruitment at the University of Toronto. To learn more about the scholarship and eligibility, please register to attend one of their information sessions.

A completed application includes the following components:

  • A completed online application – all applicable sections must be filled out, including contact information, financial information, personal details and responses to essay questions.
  • Financial documents – upload a scanned copy of financial documentation.
  • Transcript – upload a scanned copy of your secondary school transcript and any other academic information.
  • Two references – provide the names and contact details of two individuals who will serve as your referees. They will contact your referees directly and ask them to submit their letter of reference through a secure website.

For more details, Visit the Scholarship Webpage.

NDDC Foreign Postgraduate Scholarship 2023/2024 To Study Abroad – Masters & PhD

NDDC Foreign Postgraduate Scholarship 2023/2024: The Niger Delta Development Commission, NDDC, has announced the commencement of the application process for its 2023/2024 Foreign Masters and PhD Scholarships Programme.

About NDDC Foreign Postgraduate Scholarship

As part of their Human Resource Development initiatives, the Niger Delta Development Commission, NDDC, is commencing the 2023 Post-Graduate Foreign Scholarship Programme, to equip Niger Deltans with relevant training and skills for effective participation in the Local Content programme of the Federal Government, as well as compete globally in various professional fields.

Application Deadline: 2nd November 2023

Offered annually? Yes

Eligible Countries: Niger Deltan states in Nigeria which includes Akwa Ibom State, Bayelsa State, Cross River State, Delta State, Edo State and Rivers State.

Scholarship to be taken at (country): Universities Abroad

Eligible Fields of Study: The Scheme is for suitably qualified applicants with relevant Bachelor’s/Master’s Degree(s) from recognized universities in the following professional disciplines:

  1. Engineering
  2. Agricultural Science
  3. Law
  4. Medical Sciences
  5. Geosciences
  6. Environmental Sciences
  7. Management sciences
  8. ICT
  9. Education
  10. Humanities

Type: Masters, PhD

Eligibility/Criteria:

  • First degree with minimum of 2nd Class Lower Division for those wishing to undertake a Master’s Degree programme and a good Master’s Degree for PhD candidates from a recognized University.
  • Applicants must have gained admission for a Post Graduate Programme in any of the listed disciplines above, in a foreign University.
  • Applicants who have already enrolled in Overseas’ Universities are NOT eligible to apply.
  • Guarantor’s written consent of good conduct of the applicant from any of the following persons from the applicant’s community/clan.
  1. Member of National Assembly/State House of Assembly
  2. Chairman of the LGA
  3. First Class Traditional Ruler
  4. High Court Judge
  • Persons with evidence of cult membership or criminal record shall not be considered for the award.
  • Applicants must have completed the mandatory National Youth Service (NYSC).

Number of Scholarships: Several

Value of NDDC Foreign Postgraduate Scholarship: Full-fee scholarship

Duration of Scholarship: For the period of the programme

NDDC Foreign Postgraduate Scholarship Selection Process:

Candidates will undergo a comprehensive selection process, including preliminary shortlisting, a computer-based test in Rivers State, and final verification through respective Local Government Areas and Community Development Committees.

How to Apply for NDDC Foreign Postgraduate Scholarship:

  • Application must be made on-line at the Commission’s website: (www.nddc.gov.ng) with the following attachments:
  1. Recent passport photograph
  2. Local Government Identification Letter
  3. Post Graduate admission letter from a recognized Oversea University. Relevant degrees from recognized Universities.
  4. NYSC Discharge/Exemption Certificate.
  • Successfully complete application form will be assigned a registration number automatically.
  • Print the hard copy of the on-line generated acknowledgement for ease of reference.

All shortlisted applicants will be posted on NDDC website (www.nddc.gov.ng)

For more details, visit Scholarship Webpage.

DAAD In-Country/In-Region Masters & PhD Scholarships 2024/2025 for Sub-Saharan African Students

Scholarship in Germany: As part of the DAAD In-Country/In-Region Scholarship Programme, DAAD offers scholarships for PhD & Masters studies.

Application Deadline: 23rd November 2023

Eligible Countries: Sub-Saharan African Countries

To be Taken at: Sub-Saharan African Countries

About the DAAD In-Country/In-Region Masters & PhD Scholarships

The programme is funded by the German Federal Ministry of Economic Cooperation and Development (BMZ) and aims at university staff in the first line, without neglecting the public sector demand of academically trained personnel.

Aims/Objectives

The DAAD In-Country/In-Region programme aims at fostering strong, internationally oriented higher education systems in Sub-Saharan Africa with the capacity to contribute to sustainable development. To this end, scholarships are granted for development-related Master or doctoral studies for individuals who plan to pursue a career in teaching and / or research at a higher education institution in Sub-Saharan Africa.

By training future academic and professional leaders, the programme contributes to the following long-term impacts:

  • Qualified professionals’ involvement in the solution of development-related problems in Sub-Saharan Africa
  • Graduates strengthening education and research in Sub-Saharan Africa
  • Structural strengthening and regional networking of partner institutions and partner universities

To achieve these long-term impacts, the following outcomes have been formulated as programme objectives:

Programme objective 1: Graduates have qualified to take over responsible positions in their, or for their, region of origin

Programme objective 2: The participation of women and underprivileged groups is reinforced

Programme objective 3: Organizational, financial and personal capacities of partner institutions are strengthened

Type: Masters, PhD

Eligibility:

  • The target group for DAAD In-Country/In-Region scholarships are graduates and postgraduates from Sub-Saharan Africa with a first academic degree, if applying for a Master’s programme, or with a Master’s degree if applying for a doctoral programme who want to pursue Master’s or PhD courses in their home country (so called In-Country scholarships) or in another Sub-Saharan African country (In-Region scholarships).
  • Female applicants and candidates from less privileged regions or groups are especially encouraged to participate in the programme.

Number of Awards: Numerous

Value of Award: Generally:

  • Monthly allowance
  • Study and research allowance
  • Printing allowance
  • Tuition fees

Only applicable for In-Region scholarship holders:

  • Travel allowance
  • Health insurance

Duration of Award: DAAD In-Country/In-Region Funding is provided for the usual duration of a course – generally, up to two years for Masters and up to three years for the PhD degree programmes

How to Apply DAAD In-Country/In-Region Masters & PhD Scholarships

Please find below the list of degree programmes funded within this scholarship programme in the regions West and Central Africa, Eastern Africa and Southern Africa, including the links to the respective calls for applications.

West and Central Africa

i. Benin

University of Abomey – Calavi (UAC) Faculty of Agronomic Sciences, Subject fields:

ii. Cameroon

University of Dschang, Subject fields:

iii. Ghana

Institute of Statistical Social and Economic Research (ISSER), University of Ghana, Subject field:

West African Center for Crop Improvement (WACCI), University of Ghana, Subject field:

West African Centre for Cell Biology of Infectious Pathogens (WACCBIP), University of Ghana, Subject field:

iv. Nigeria

Federal University of Technology, Akure (FUTA), Subject fields:

Benue State University Makurdi (BSUM), Subject fields:

Eastern Africa

i. Kenya

Jomo Kenyatta University of Agriculture and Technology (JKUAT), Subject field:

Jomo Kenyatta University of Agriculture and Technology (JKUAT), Subject fields:

Moi University, Subject field:

East and South African-German Centre of Excellence for Educational Research Methodologies and Management (CERM-ESA) – Moi University, Subject field:

Dedan Kimathi University of Technology (DeKUT), Subject field:

Partnership for African Social and Governance Research (PASGR)*, Subject field:

Pwani University; Subject field:

ii. Tanzania

Ardhi University, Subject field:

Nelson Mandela African Institution of Science and Technology (NM-AIST), Subject fields:

iii. Uganda

Busitema University, Subject field:

Mbarara University of Science and Technology (MUST), Subject fields:

Southern Africa

i. Botswana

Botswana International University of Science and Technology (BIUST), Subject field:

ii. Malawi

Lilongwe University of Agriculture and Natural Resources (LUANAR), Subject field:

  • Master: Aquaculture and Fisheries Science

Malawi University of Business and Applied Sciences (MUBAS), Subject field:

iii. Namibia

Namibia University of Science and Technology (NUST), Subject field:

  • PhD: Computer Science

South Africa

(In-Region scholarships only; In-Country scholarships for South Africa are addressed in a separate call for applications -> daad.de/go/en/stipa10000279)

Stellenbosch University (SUN), Subject fields:

  • Master: Molecular Biology and Human Genetics (MBHG)

University of Cape Town (UCT), Subject fields:

  • Master: Urban Studies – Southern Urbanism

University of the Western Cape (UWC), Subject fields:

  • Master: Development Studies at ISD
  • PhD: Development Studies at ISD

For more details about the DAAD Masters & PhD Scholarships, visit the Webpage for Details.

Why should you do a PhD? | 10 benefits of doing a PhD

Below are 10 benefits of doing a PhD:

1. Exposure: You will likely travel to another country or city for your PhD. During your PhD, you will also travel to different countries for conferences, workshops, research visits, and field trips. All of this will get you a lot of exposure. You will learn and experience many interesting things.

2. Career growth: One undeniable benefit of PhD is that it will boost your career. This is especially true for academics. Other than this, PhD qualification is also required to work in advanced positions in industry and government agencies.

3. Developing hard skills: You will develop deep technical skills in your field. For example, you will learn the implementation of ML/DL systems if your PhD is focused on AI. These deep technical skills will make you stand out among your competitors.

4. Developing soft skills: PhD will enrich your personality with several soft skills such as presentation, communication, collaboration, networking, critical thinking, and so on. You will often practice these during your PhD.

5. Growth in your professional network: You will interact with several individuals during your PhD. These interactions will happen in multiple places – conferences, workshops, seminars, and so on. This network will open doors for future opportunities.

6. Knowledge contributions: You will contribute to the body of knowledge in your field. This will get you a strong feeling of accomplishment. Your findings may have a direct impact on the well-being of people.

7. Resilience: Your PhD journey will test you in many ways – paper rejections, criticisms, financial hardships, and so on. All of this will make you resilient. Eventually, you will be unbreakable in front of many such challenges.

8. Problem solver: You will become a problem solver. Since most of the PhD is about identifying and solving complex problems, your mind will get trained for it. Then, this mindset can help you solve many non-research problems too.

9. Being paid to learn: Most PhD students have scholarships covering their tuition fees and living expenses. In return, you work on things you are passionate about and learn many skills.

10. Get you the title “Dr”: If you are interested in titles, PhD will get you that too. You can call yourself ‘Dr.‘ after successfully completing your PhD.

How to Conduct a Solid Literature Review

What is a literature review?

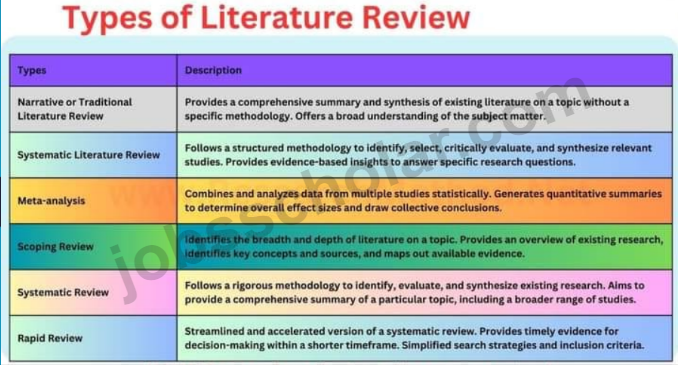
A literature review is a piece of academic writing demonstrating knowledge and understanding of the academic literature on a specific topic placed in context. A literature review also includes a critical evaluation of the material; this is why it is called a literature review rather than a literature report.

Types of Literature Review

Types of literature review

Below are the steps you can follow to conduct a literature review:

1. Specify the need for the review: Why you are conducting the review? Most of the PhD students conduct literature review at the start of their PhD. The aim here is to identify the research gap that they can fill in their PhD. There can be other reasons for literature review too.

2. Define the research questions: In consultation with your advisor, you will specify the broader research topic for your PhD. Then, you will specify the initial set of research questions for the literature review. Mostly the questions are of the style that what are the key challenges and solutions in a particular domain.

3. Conduct a pilot study: Once you specify the initial research questions, then you will manually identify around 10 primary studies relevant to your topic. Based on these 10 papers, check whether you can answer the initial set of questions. If not, try to modify your questions accordingly.

4. Design the search string: Define a search string based on your research questions that can retrieve relevant papers from well-known databases such as IEEE, ACM, Google Scholar, etc. You can verify the search string by making sure that it returns the already known 10 relevant papers.

5. Define inclusion and exclusion criteria: The search string will return a larger number of papers. All of these will not be relevant to your literature review. So, you will define inclusion and exclusion criteria to help you guide in the selection process. You can include study quality assessment in this step.

6. Select the relevant studies: Using the inclusion and exclusion criteria, select the most suitable studies that can answer your research questions. You can do this selection based on reading paper title, paper abstract, or the whole paper.

7. Start extracting the data from the papers: Once the study selection is complete, design a form that you will use for data extraction. This form determines what items you will extract from the papers. Start reading each paper and extract items as per the designed data extraction form.

8. Analyzing and reporting the data: Once data is extracted from all the papers, you will analyze the data using various techniques (e.g., thematic analysis) to answer the research questions. Alongside the analysis, you can also report the data in form of a report or secondary study.

How to speak like a leader at work | DON’T Say these 7 Things

How to speak like a leader at work: Do you want to learn how to who speak like a leader? If you want to be seen as a leader, please avoid seeing these 7 things.

The words you speak can make a big difference between your success and failure. Read this article, how to speak like a leader at work, to end.

Most people are not aware of the change they need to make in their communication style to succeed in their career. Leaders speak differently from the average employee. If you want to be seen as a leader, you will have to speak like one.

Want to Speak like a Leader? DON’T Say these 7 Things!

Here are seven things you should avoid saying.

  1. I agree to everything

The workplace is more competitive. Simply keeping your head down and doing a good job is not enough to get you noticed or promoted. Harvey Coleman did extensive research and determines success is based on three key elements P-I-E.

P – performance accounts for 10% of what makes an individual successful,

I – image accounts for 30% and

E – exposure accounts for 60% of your career success.

In order to advance in your career, you need to be visible. Your impact must be felt. Companies are hiring you because they want to know what you think. Share your ideas. Speak up. Speaking up in meetings can be daunting.

It comes down to a lack of confidence or poor self-esteem. Believe in yourself. If you aren’t participating, you’re watching from the sidelines. It’s time to get in the game. If you think your opinion doesn’t matter, it does.

Speaking up is a great way to make yourself stand out at work because most people are always agreeing to everything.

  1. I don’t know or I’ll try

I don’t know sounds unprofessional and dismissive, especially saying this in the workplace, to colleagues or customers. It comes across as that’s not my job. I don’t get paid enough for this. Leadership is about accountability.

Leaders are always looking for solutions. Taking the initiative and filling in the gaps sets you apart from the crowd. Sitting back and doing nothing is the worst thing you can do.

When someone asks you a question, instead of saying I don’t know, use these phrases:

“I don’t have enough information to answer your question, but I can find and let you know.”

“That’s an excellent question. I’ll look into it and get back to you by the end of day.”

Additionally, in your speech with leaders, replace “I’ll try” with “I will”. I’ll try implies the possibility of failure.

Leaders get things done. Give a time frame. It doesn’t mean if your boss is used on unreasonable requests, you will always have to say yes.

You can say something like. “given my current task of A, B and C, I will have this on your desk by Friday.” Be assertive.

  1. Avoid filler words such as, AS, UM, LIKE, UH

Research shows that using excessive filler words makes you sound indecisive. Also, avoid using these words excessively, such as: Literally, Basically, Quite frankly, Technically.

For example, basically the report is due on Tuesday. Actually, the folder is on my desk. Technically, I am on a break right now.

First of all, don’t respond with: Seriously? Really?

As a leader, you want to communicate clearly and concisely.

How do you counteract fillers?

Two things:

  • Slow down how fast you speak so you will have time to phrase your sentences more coherently.
  • Pause: There is nothing more effective than a well-timed pause. Practice pausing to be interesting to influence and keep people’s attention, you will have to be expanding your vocabulary.

The secret to being more eloquent in your speech is to read, read and read.

  1. Avoid saying, I or me, Say we and us.

Don’t say: I won,

Say: we won.

Leaders take an enterprise view that focuses less on themselves and more on the wider organization.

For example, “I” can only get you so far. “We” can get you the results you want.

In research conducted by Jim Collins, he found that the difference between top performing and lower performing CEOs was their use of the same words ‘I’ and ‘we’.

The lower performing CEOs used “I” many more times than the word “we”.

The fact is, people trust leaders that say ‘we’ more than ‘I’. Using we brings a sense of cohesiveness, a sense of belonging, and makes it a team effort.

Instead of saying, ‘I’ achieved those results.

Say, ‘we’ achieved those results.

Replace: ‘You’ need to fix this.

With: ‘Let’s’ figure out how to fix this.

As a leader, you achieve results with and through people. Your language should always reflect this.

  1. I feel

For example, I feel this isn’t a good idea. Don’t go by feelings, go by facts.

I have observed, I have found, the data shows, a trend I am noticing.

Nobody cares about how you feel about the data. Tell them what you have observed, Found, Discovered.

  1. Avoid words and phrases that undermine your authorities and diminish your credibility, i.e Disclaimers and tentative words.

Stop starting sentences with: I think, maybe we should, might, could, possibly, probably, sort of, kind of.

Also, avoid requesting confirmation. We see confirmation with words and phrases such as: Right? Does that make sense? Do you know what I mean?

When you show hesitation about your own ideas, it communicates a lack of confidence and shows you are insecure about your message. You give others permission to reject it. Stop doubting yourself.

  1. Honestly.

You may want to emphasize your point, but when you start with honestly, it can make people question everything you have said before.

If you have to state you are being honest this one time, were you lying the other times? Additionally, using “trust me” or “if I’m being honest” can make you sound untrustworthy. Be forward.

You could use the phrase to be blunt, or you could just get straight to the point. Avoid saying this in professional discussions.

Finally, don’t say anything at all. Yes, you heard me correctly. If you want people to respect you, it’s important to listen.

Remember, sometimes speaking like a leader means taking a back seat and not speaking at all, but letting others speak instead.

Non-verbal communication is also important. Your body language must supplement what you are seeing.

In summary

A title doesn’t make you a leader. It’s your impact and influence.

USCIS to Speed Up Processing Times

Recently, USCIS announced some plans that it has to improve processing times for immigration applications and to reduce the major backlogs that they currently have.

This guide will talk about some updates that USCIS recently announced about its efforts and its plans to improve processing times.

On March 29, USCIS put out a news release in terms of what steps it plans on taking to help reduce processing times. The first thing that USCIS mentioned is that it’s going to attempt to improve its cycle times.

Basically, USCIS has this internal metric, this internal figure that they track that they refer to as a cycle time, which is essentially their way of identifying how long they expect the case to take.

The way that USCIS explained how it plans to reduce its cycle times is that they’re going to create new goals for what they want their new cycle times to be. They’re going to attempt to achieve those goals by increasing staffing, improving their technology, and in general, just increasing their overall capacity. With these changes, they expect to reduce their overall processing times.

Basically, what we’re looking at here is specific forms and what they want their goals to be for the overall processing time of these forms. For example, the form I-129, they’re projecting their goal to be two weeks with premium processing.

Form I-140

Form I-140, it’s another immigrant petition with premium processing. They’re also expecting it to be at around two weeks.

The Form I-129

For the non-premium, I-129, currently for many application types, under the current processing times, it could take anywhere from six months to eight months, or maybe even more.

But under this new goal that they’re setting for themselves, they are planning to get these I-129 processed without premium processing in two months.

Again, on three month category, we have the form I-765, which is the Application for Employment Authorization.

The Form I-131

There is form I-131, which is the form that somebody would use to apply for advanced parole, and other forms which they are planning their goal is to get these processed within three months. Before now, those forms are on six months plus period.

The N-400

The N-400, this is the Application for Naturalization. This is the application that somebody uses to apply for citizenship. These cases take nine to twelve or more months for these to get processed but USCIS is planning to get these processed within six months.

The Form I-485

The form I-485, which is the adjustment of status. This can take nine to twelve to 14 or more months. USCIS plans to get these processed within six months. And there’s more really impressive goals as well.

The form I-526

The form I-526 is the immigrant petition for somebody that’s planning on applying for an EB-5 investor visa. The form I-526 right now can take 18 or more months to process. It’s one of those forms that just takes a tremendously long time to process.

USCIS has set a goal to get these processed within six months. If that can actually happen, it would be a tremendous improvement from the current processing time.

If USCIS can actually leverage technology, increase its workforce, and increase its overall capacity to achieve these goals, it would be a tremendous benefit for people that are planning on applying for immigration benefits.

Above are just one of the sections of this news release that USCIS put out.

In addition to that, in addition to its overall plan of improving its Processing Times by tweaking its Internal Cycle Time Goals, in its latest news release, USCIS announced that it plans to expand the premium processing service.

Premium processing is an optional additional service that somebody can select to do, and it’s only available for certain cases.

What USCIS is announcing is that they plan to expand the types of cases that are eligible for premium processing. So basically, if there are more types of cases that are available and eligible for premium processing, it means that more people can take advantage of this service to get their cases processed in 15 days.

So among the various case types that USCIS plans to make eligible for premium processing are the EB-1C immigrant petition, which is a green card option for multinational managers and executives.

Basically, it’s a certain case type where somebody that’s working as a manager or an executive for a foreign company can transfer to a related company in the US, and also work as either a manager or executive.

In addition, USCIS plans to eventually make the EB-2 national Interest Waiver eligible for premium processing. The national interest waiver is a special green card option for somebody that’s going to be doing some sort of work in the United States that’s in the national interest, for example, like a cancer researcher or a doctor or some other type of professional that’s going to be doing something in the United States that’s in the national interest.

Again, the goal is that by making more case types eligible for premium processing, more people can get their cases processed faster.

Another point that was mentioned by USCIS in this news release is that it plans to make employment authorization documents more available to immigrants that are applying for them.

For example, they are working to extend the validity period of certain types of employment authorization documents, also known as EADs. They plan to improve overall processing times for Employment Authorization applications, along with other steps as well.

In Summary

USCIS has announced a multi-step kind of plan or a multi-pronged plan for improving processing times for immigration cases, for reducing overall backlogs, and in general, making immigration cases move faster.

The three items that were mentioned were that USCIS plans to improve its cycle time goals, and with that, eventually get to a point where actual processing times are improved by increasing staffing, better utilization of technology, and overall increasing the capacity that USCIS has.

In addition, USCIS is planning on expanding the types of cases that are eligible for premium processing, and USCIS plans to improve access to employment authorization documents.

I hopefully you found this information very helpful.

DISCLAIMER: This guide/article and content is designed for general information only and is NOT legal advice. The information presented in this guide/article should not be construed to be formal legal advice nor the formation of a lawyer/client relationship. The information presented in this guide/article does not create an attorney-client relationship nor is it a solicitation to offer legal advice. If you need legal advice, you may contact an attorney. You should seek the advice of an attorney in your jurisdiction before taking any legal action.

Red Flags When Applying For a U.S Marriage-Based Green Card

In this guide, we will learn some red flags that an immigration officer may notice if you’re applying for a marriage-based green card. If you’re planning on applying for a marriage based green card, this is definitely an article that you want to read.

U.S Marriage-Based Green Card

So as a quick background, you should know that somebody can apply for their green card based on being married to a U.S citizen or a lawful permanent resident, a green card holder.

One of the most important parts of this process and one of the most important requirements, is that the couple needs to show that they’re in a bona fide marriage. This means that at the time the couple got married, they truly intended to build a life with one another.

So with that quick overview, let go over some red flags, i.e some things, some factors that, if present, could cause an immigration officer to raise their eyebrows and to question the case and to maybe look a little bit deeper into the case.

It is important to note that if there is a red flag with your case, it doesn’t mean that your case is going to be denied. It just means that you should be aware that this is a red flag and you should be prepared to file a strong case with strong documentation, making it very clear that you and your spouse are truly in a bona fide marriage.

Meaning that you and your spouse truly intended to build a life with one another when you got married.

Red Flags When Applying For a Marriage-Based Green Card

Below are the red flags when applying for a U.S Marriage-Based Green Card:

  1. If you and your spouse have a major age difference.

For example: if you and your spouse have a 20 or more year age gap, you should be prepared to make it clear to the immigration officer that you are truly in a bona fide marriage.

Because the age gap could be a red flag that causes the immigration officer to just be curious about the case, a little bit more.

  1. Not living together.

If you and your spouse do not live together, it’s a red flag. You should be prepared to explain why you don’t live together.

You should be prepared to explain that even though you and your spouse don’t live together, you’re still in a bona fide marriage.

  1. If you and your spouse do not share a common language.

Think about it like this, from the standpoint of an immigration officer, if you and your spouse do not have a language that you both speak in common, the immigration officer is going to wonder, how do they communicate? If they have a hard time communicating, how could they be in a bona fide marriage?

So you should be prepared to explain this if you and your spouse do not share a common language.

  1. If you and your spouse do not have strong documentation evidencing a shared life together.

As mentioned earlier in this guide, we talked about how one of the most important requirements for getting a marriage based green card is being able to demonstrate that you and your spouse are in a bona fide marriage, meaning that you and your spouse intended to build a life together when you both got married.

One of the ways that we demonstrate that you and your spouse have a bona fide marriage is through the documentation that we provide in your case.

The documentation is commonly referred to as joint documents. Some examples of joint documents are;

  • evidence of a shared bank account,
  • evidence of photographs together showing that you and your spouse traveled the world together maybe, or you and your spouse took vacations together, or photographs of you and your spouse spending time with each other’s family.

Other evidence of joint documents include utility bills with both of your names on them, perhaps an organization membership card with both of your names on it, a cell phone bill with both of your names on it.

Other examples are perhaps a lease with both of your names on it, or a deed to property with both of your names on it. These are all examples of joint documentation.

When an immigration officer sees these joint documents, it’s further proof that you and your spouse are in a bona fide marriage. So a red flag is if you do not have this type of documentation.

As mentioned above, it’s very important when applying for a marriage based green card to have strong documentation of sharing a life with one another, like a joint bank account.

Not to go too much on a tangent, but if you and your spouse do have a joint bank account with one another, you should actually use that bank account. It shouldn’t just be a bank account that isn’t used. It should be a bank account that you use to pay bills with and you deposit money into that account.

  1. Having a weird immigration history.

For example, the situation where somebody gets their green card because their spouse that was either a U.S Citizen or a local permanent resident petitioned for them, and then once they got their green card, they divorced their spouse and then they married somebody else and petitioned for their green card.

If somebody gets married and their spouse applies for their green card, so they get their green card, and very shortly after they get their green card, they divorce their spouse and then get married to somebody else and petition for that new spouse’s green card. This scenario is a red flag.

Again, just to repeat, somebody gets petitioned to get their green card, and shortly after they get their green card, they divorce their spouse that petitioned for them, and they get remarried to somebody else and petition for that new spouse’s green card. That’s a red flag that somebody should be prepared to explain.

  1. The situation where somebody gets their green card because their spouse that was either a U.S Citizen or a local permanent resident petitioned for them, and then once they got their green card, they divorced their spouse and then they married somebody else and petitioned for their green card.

Again, just to repeat, for example, is if somebody petitions for their spouse and their spouse gets a green card, then they divorce that spouse, and then they get remarried to somebody else and petition for that second spouse’s green card.

So it’s similar to example number five, but a little bit different. That can also be a red flag that the couple should be prepared to explain.

In summary

So as a quick overview, we went over six red flags when applying for a U.S Marriage-Based Green Card.

  • Red flag number one was a major age difference.
  • Red flag number two was if you and your spouse do not live together.
  • Red flag number three is if you don’t share a common language with one another.
  • Red flag number four is if you do not have strong documentation showing a shared life with one another.
  • Red flag number five was the situation where somebody gets their green card because their spouse that was either a U.S Citizen or a local permanent resident petitioned for them, and then once they got their green card, they divorced their spouse and then they married somebody else and petitioned for their green card.
  • Red flag number six was the situation where somebody petitions for their spouse to get a green card and then divorces that spouse and then petitions, gets remarried and then petitions for somebody else’s green card.

So there you have it, six red flags when applying for a U.S Marriage-Based Green Card.

Again, if these scenarios apply to you, don’t think automatically that your case is not going to get approved. Just know that these are just things that are going to make an immigration officer look a little bit closer into your case, and you want to be prepared to explain these situations.

I hope you found this guide extremely helpful. If you know anybody that could benefit from this information, definitely make sure to share this guide with them.

Thank you so much for reading into this guide.

DISCLAIMER: This guide and content is designed for general information only and is NOT legal advice. The information presented in this guide should not be construed to be formal legal advice nor the formation of a lawyer/client relationship. The information presented in this guide does not create an attorney-client relationship nor is it a solicitation to offer legal advice. If you need legal advice, you may contact an attorney.

5 Tips to Help You Get Your B1/B2 Visa Approved

In guide, you will learn five Tips on How To Get Your B1/B2 Visa Approved.

Benefit of the B1/B2 Visa

The B1/B2 Visa is also known as a Visitor Visa, and it can allow you to either enter to Conduct Various Business Activities or To Act as a Tourist in U.S.

Another benefit of the B1/B2 Visa is that it can oftentimes allow you to stay in the United States for Up To Six Months at a Time.

5 Tips to Help You Get Your B1/B2 Visa Approved

Let now look at the five Tips on How to Have Success with Your B1/B2 Visa Application.

  • TIP 1: Make Sure That You Have Very Strong Ties To Your Home Country.

For example: When you go in for your B1/B2 Visa Interview, the Immigration Officer is required to presume that you are an Intending Immigrant. What that means is that they are required to initially believe that you are planning to go to The United States and to stay there permanently.

It is your duty to show them that You Do Plan to Return To Your Home Country. The way that you can show that you Plan to Return to Your Home Country is by showing that you Have Strong Ties To Your Home Country.

Some Examples of Strong Ties to Your Home Country include;

  • showing that You Have A Home Or An Apartment In Your Home Country,
  • showing that You Have A Business In Your Home Country or A Job In Your Home Country,
  • showing that You Pay Taxes In Your Home Country,
  • that you have Family In Your Home Country,
  • that you have a Bank Account in Your Home Country.

All of these different things can help to show that you have strong Ties to Your Home Country. When an Immigration Officer sees that, they’re more likely to believe that you do Truly Believe to Return To Your Home Country and that you’re Not Planning On Staying In The United States Permanently.

  • TIP 2: Make Sure That You Have Enough Money In Your Bank Account to Cover The Expenses Of Your Trip

When you’re in the United States on a B1/B2 Visa, you are not allowed to Work. So when you go in for your B1/B2 Visa interview, the Officer is going to want to make sure that you have Enough Money to Cover the Expenses of your Trip.

Otherwise, they’re going to think that you’re going to the United States to Unlawfully Work. So make sure to have Documentation showing that you have Enough Money in your Bank Account to Cover the Expenses of your Trip.

If your trip expenses are going to be very Minimal because. For Example, you’re going to be staying with a Friend or Family Member, then be sure to have Documentation to prove that.

  • Tip 3: Make sure to have documentation to prove the reason that you’re coming to the United States.

For example, if you’re coming to the United States to visit Disneyland, it would be great to have an itinerary for what you’re planning on doing in the United States.

Perhaps having tickets purchased for Disneyland or having a hotel booked in Orlando, similar such documents.

If you’re planning on coming to the United States to attend a business conference, you should have an invitation for that conference or tickets booked for that conference.

Those documents are going to be very helpful to prove that the reason that you’re coming to the United States is in fact, to do that activity that you’re letting them know that you plan to do.

  • Tip 4: Be prepared to explain your relationships with people in the United States

During your B1/B2 visa interview, they’re going to ask you whether you have a boyfriend or a girlfriend in the United States or whether you have a parent or a sibling or a child that could potentially sponsor you for a green card.

The reason that they’re asking you this question is to determine whether you’re coming to the United States and then that you plan to stay in the United States and have them petition, for you to have a green card.

So it’s up to you to be able to explain to them that although you’re entering the United States and that you have a relationship with somebody that could potentially sponsor you that is not your plan.

Just tell them you’re just planning on coming for that conference or for that tourism purpose, and that you’re going to be leaving after that initial purpose of your trip is accomplished.

  • Tip 5: Be very careful about the information and the content that’s on your phone.

Immigration officers, particularly Customs and Border Protection, may check your phones to search for potentially problematic information. Make sure that you have nothing on your phone that could potentially be misconstrued by an immigration officer to think that you’re planning on coming to the United States for some type of an impermissible purpose.

So make sure that your phone doesn’t have any sort of problematic information that could potentially be misconstrued by an immigration officer.

Those are 5 tips to help you have a successful outcome on your B1/B2 visa.

I hope you found this guide extremely helpful. If you know anybody that could benefit from this information, definitely make sure to share this guide with them.

Thank you so much for reading into this guide(How to get your B1/B2 visa approved).

DISCLAIMER: This guide and content is designed for general information only and is NOT legal advice. The information presented in this guide should not be construed to be formal legal advice nor the formation of a lawyer/client relationship. The information presented in this guide does not create an attorney-client relationship nor is it a solicitation to offer legal advice. If you need legal advice, you may contact an attorney.

How To Retrieve Lost DV Lottery Confirmation Number

How To Retrieve Lost DV Lottery Confirmation Number: Losing your Diversity Visa (DV) Lottery confirmation number can be stressful, but there are steps you can take to retrieve it. Here’s a guide on how to retrieve your lost DV Lottery confirmation number, in case you lost or misplaced it because you can’t access the entrance status check portal without your confirmation number.

Diversity Visa Lottery program

The Diversity Visa Lottery program has been present for years. The program aims at assisting individuals from different countries with accomplishing inhabitant visas for the United States of America. The Diversity Visa lottery is also called the Green Card Lottery.

To get a green card lottery (also known as DV Lottery), you must meet up the necessities set forward by the organization and apply for the lottery without any problem. The way to apply incorporates the process of filling the online form, presenting the essential records, and a passport size photo. When you apply and satisfy the requirements, you will be selected for the Diversity Visa lottery, without any problem.

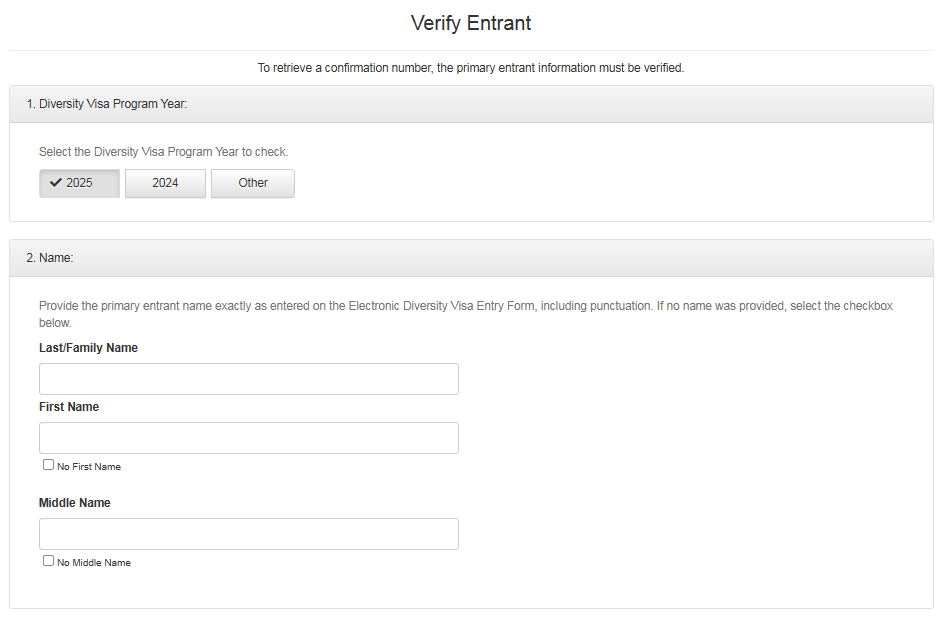
If you submitted the entry for DV-2025 Lottery, the entrance status is now open. The U.S. Department of State Electronic Diversity Visa Entrant Status Check for DV-2025 applicants is available. See How to Check DV-2025 Lottery Results: A Step-by-Step Guide.

In order for you to check if you are selected for Diversity Visa (DV) Lottery, you need to have confirmation number. After you successfully registered for the Diversity Visa Lottery, you are expected to keep your confirmation number safe, because this is the only way you will be able to check if you’re selected or not.

How To Retrieve Lost DV Lottery Confirmation Number

What if I lost my DV confirmation number, what will i do to retrieve it back? Losing your DV Lottery confirmation number can be inconvenient, if you lost or misplaced your confirmation number, you need not to panic, because by following these steps below, you can retrieve it and continue with the DV Lottery results checking process.

STEP 1: Login to the U.S. Department of State Electronic Diversity Visa official website

STEP 2: Click on “Check Status.”

How To Retrieve Lost DV Lottery Confirmation Number

STEP 3: Click “Continue”

How to check DV Lottery status

STEP 4: Click “Forgot Confirmation Number.”

Steps to retrieve Lost DV Lottery Confirmation Number

STEP 5: Choose “YEAR” which is going to be 2025.

How To Retrieve Lost DV Lottery Confirmation Number

After clicking the Year button, you’re going to simply provide this information:

  • Your Last name
  • Your first name
  • Your middle name
  • Date of birth (month, day, and year) date of birth
  • Email address.

Procedures To Retrieve Lost DV Lottery Confirmation Number

STEP 6: After you are done filling up the boxes with the right details, click “Submit”.

If the information matches their records, the system will display your confirmation number. To avoid losing your confirmation number in the future, write it down and keep it in a safe place. Consider storing a digital copy in a secure location, such as a password-protected document or a secure notes app.

Note: It very important you use the email address that you used when submitted your DV application, when you registered/applied for DV lottery program. Don’t use different email address because the system will not recognize it. Make sure you use the same email address that you have used for Electronic Diversity Visa entry form and then simply type put the authentication code that will appear, and this is how you’re going to receive the confirmation number to your email.

LATEST UPDATE: How to Check DV-2025 Lottery Results: A Step-by-Step Guide

The U.S. Department of State Electronic Diversity Visa Entrant Status Check for DV-2025 applicants is available until September 30, 2025. The Entrant Status Check for DV-2024 applicants will remain open until September 30, 2024. Be sure to have the Entrant’s Confirmation Number, Last/Family Name, and Year of Birth to check the entrant status online.

DISCLAIMER: This guide and content is designed for general information only and is NOT legal advice. The information presented in this guide should not be construed to be formal legal advice. This is not the U.S. Department of State Electronic Diversity Visa official website. Please ignore any sites, organization or anyone asking or demanding any form of payment from you, for jobs or visa preparations.

What to do After Applying for OPT EAD with USCIS (F1 Visa Employment Guide)

Are you an F1 visa student who has applied for the OPT EAD? In this guide, you will learn what to expect after mailing your OPT EAD application to USCIS, what to do after applying for your OPT EAD and how long to get USCIS receipt notice.

If you have successfully submitted your OPT application to USCIS, as discussed in this guide (How To Apply For OPT EAD), you might be wondering what are the next steps to follow after submitting your OPT. In this guide, you will learn what you can do and what to expect after you’ve applied for your OPT.

Note: After applying for OPT, you are not allowed to start working until you have received our EAD card and the “valid from” date on your EAD card has been reached.

What to do After Applying for OPT EAD with USCIS

  1. Tracking Delivery of OPT EAD Application

The very first thing to do is to track the delivery status of your OPT application. If you’ve mailed your OPT application, you should have requested the tracking number from your career service provider.

With this tracking number, you should be able to track the confirmation of delivery of your OPT application to USCIS.

If you experience any delays with the delivery of your OPT application, you should quickly contact the customer service rep of your career service provider or USPS.

Once you’ve confirmed the delivery of your OPT application on your current service provider’s website, keep a copy of this delivery confirmation for your records.

If you’ve paid for the OPT application fee using your personal check, keep an eye out on your bank account records just to see if USCIS has processed your OPT application fee.

  1. Await Receipt of Form I-797C

Once you’ve confirmed the delivery of your OPT application, the next step is to await the receipt of a form called the Form I-797C Notice of Action. This form will be sent by USCIS.

Typically, you can expect to receive this Form I 797 C in about four weeks, and in some cases it might take slightly longer than four weeks.

But nevertheless, you should not panic if you have not received your Form I-797C after four weeks of the confirmation of delivery of your OPT application.

Usually, if you’ve paid for your opt application fee using a personal check, you can tell that USCIS has pre-processed your OPT application. If your bank account records can show that your OPT application fee has been cashed by USCIS.

On the top left corner of Form I-797-C, you would find your receipt number and with this receipt number, you can track the status of your case on the USCIS case tracking website. Read this guide (4 BEST Ways to Track/Check Your USCIS Case Status Online) to know the full detail about the four best ways of tracking your case status with USCIS.

  1. Await Notice of Approval and EAD Card

If you’re successful with your opt application on the Case Status tracking website, your case status will indicate that your OPT has been approved.

Next, USCIS will mail you a Form I 797 Notice of Approval, followed by your Employment Authorization Document card. This Form I 797 Notice of Approval, will arrive in the mail before you receive your EAD card.

Responding to a USCIS RFE

In the unfortunate circumstance that your OPT application requires more investigation by USCIS, USCIS will send you a letter called a Request for Evidence (RFE). On this Request for Evidence, USCIS will explicitly define what documents you need to provide in order for your case to be adjudicated.

If you received a request for evidence from USCIS, make sure to contact your school’s international office as soon as possible, to proceed with next steps.

It is very important that when you respond to an RFE, make sure to submit all the requested documents by USCIS in a single mail.

  1. Submitting Copies of EAD Card to your DSO

Finally, once you’ve received your ID card in the mail, make sure that information listed on the EAD Card is correct. And once that’s correct, make a copy of the front and back of the ID card and send that to your school’s international office.

You should also note that you’re not allowed to start working on OPT until the start date listed on your ID card is “Current”. Failing to do so will result in you violating your OPT status and your OPT could be terminated.

Those are what to do After Applying for OPT EAD with USCIS.

Frequent Questions About OPT EAD and Answers

Question: After getting your EAD and signing a job contract, who do you send your offer letter to?

Answer: For the OPT, you are only required to report your employment to the Student and Exchange Visitor Program (SEVP). Usually, there is no obligation here to show your offer letter for confirmation. You simply state the employer name, address, job role, and pay for your employment.

DISCLAIMER: This guide and content is designed for general information only and is NOT legal advice. The information in this guide should not be construed to be formal legal advice. For legal advice, you should consult an attorney.

Automatic Visa Revalidation Experience for F1, J1, H1B Visa (A Complete Guide)

Are you a nonimmigrant in the U.S with an expired U.S visa? If so, in this guide you will learn how to travel in and out of the U.S with an expired U.S visa using the automatic visa revalidation rule.

You will also learn 6 best travel tips to follow when traveling using the Automatic Visa Revalidation Rule. So make sure to read this guide through to the end as you’re going to find this information very helpful.

What is Automatic Visa Revalidation?

The Automatic Visa Revalidation Rule is a U.S immigration policy that allows certain nonimmigrants to re-enter the U.S after traveling to Canada or Mexico for a period of 30 days or less with an expired U.S visa.

Automatic visa Revalidation Countries

If you are a nonimmigrant in an F or J visa status, you’re also allowed to visit adjacent Islands in the Caribbean, Canada and Mexico for a period of 30 days or less and be able to re-enter the U.S with an expired F or J visa.

These adjacent Islands in the Caribbean include countries such as Jamaica, the Bahamas, Barbados, Bermuda, the Dominican Republic, San Pierre, and Trinidad, just to mention a few. For a full list of countries defined as adjacent Islands, you can use search engines to get more.

U.S nonimmigrant travelers who seek to use the Automatic Visa Revalidation Rule must have in their possession an unexpired admission stamp or paper form I-94 at the time they seek to re-enter the U.S.

Automatic Revalidation and Change of Status

The Automatic Visa Revalidation Rule is also applicable to nonimmigrants in the US who have changed their status but have not obtained a new U.S visa for the new status.

For example, if you successfully changed your F1 status to an H1B status but have not obtained an H1B visa;

  • you’ll be able to re-enter the US with an expired F1 visa to be admitted into the H1B status or
  • you could re-enter the US with your current F1 visa into an H1B status.

Who is eligible for Automatic Visa Revalidation?

Let’s talk about some required documents you must have in order to be eligible to re-enter the U.S using the Automatic Visa Revalidation.

  • As mentioned earlier, you need to present a valid admission stamp or in the case of someone who entered the U.S at a land border crossing, you need to present a valid paper Form I-94. This admission stamp or paper form I-94 must show that your duration of stay in the U.S is unexpired.
  • You must have a valid passport and an expired U.S visa, and it is okay if your current passport does not contain your expired U.S visa.
  • For nonimmigrants in the F and J status, you must provide a valid Form I-20 or valid form DS-2019, respectively.
  • Most importantly, you must have been absent from the U.S for a period of 30 days or less while visiting Canada or Mexico, and if you happen to be an F or J visa holder, you can also visit adjacent Islands, as discussed previously.
  • In the case that you’ve been approved for change of status but have not obtained a new visa for the new status, you must present a Form I-797, Notice of Approval at the time of your re-entry into the US.
  • You must have been in good standing and had maintained your U.S status at the time of your departure from the U.S.

Who is NOT eligible for Automatic Visa Revalidation?

Let’s talk about the category of nonimmigrants who are not allowed to use the automatic Visa Revalidation rule.

  1. Nonimmigrants from countries listed as state sponsors of terrorism.

Nonimmigrants travelers from countries listed as State Sponsors of Terrorism are not allowed to use the automatic visa revalidation. The United States Department of State maintains an updated list of countries listed as State Sponsors of Terrorism.

  1. Nonimmigrants who traveled outside of Canada or Mexico or an Adjacent Island during the 30-day absence from the US.

For example, a nonimmigrant traveler with an expired H1B visa holder who travels to Canada and then travels to Europe and comes back to Canada and tries to re-enter the U.S would not be able to use the Automatic Visa Revalidation Rule.

  1. Nonimmigrant Who Applies for a U.S Visa during the 30-Day Absence

Applying for a U.S visa in Canada, Mexico, or an Adjacent Island country during your 30-day absence from the U.S immediately disqualifies you from using the automatic visa revalidation rule to re-enter the U.S.

In the event that you apply for a U.S visa during your 30-day absence and your visa is rejected, you would have to obtain a valid visa to re-enter the U.S.

Travel Tips when Using Automatic Visa Revalidation

Let now look at the six best travel tips to follow when traveling using the Automatic Visa Revalidation. These tips here are for educational purposes only.

Tip 1: Print out an article from the Department of Homeland Security’s website that explains the Automatic Visa Revalidation rule.

You always want to have this print out in your possession any time you encounter a U.S Customs official or an airline representative. You will get more information from the Homeland Security’s web page that explains the automatic visa revalidation.

You will found it easier to explain the Automatic Visa Revalidation rule to an airline representative who is not familiar with the rule by simply providing a print out from the Homeland securities web page that explains the automatic Visa revalidation.

Tip 2: Contact the airline you’re going to be flying and ask them if they have any restrictions against passengers who plan to use the automatic Visa Revalidation rule.

Some Airlines might have very strict policies that prevent anyone with an expired visa from even attempting to board a flight to the U.S, so you need to be aware of this information before planning your trip to depart the U.S.

Tip 3: If you happen to have a paper form I-94, you must not surrender your I-94 to any airline representative who asks you to.

This is because during your re-entry to the U.S, a Customs official will need to see your paper from I-94 in order to admit you back into the U.S.

Tip 4: Nonimmigrants who may have applied for a change of status and have been approved for a change of status but have not obtained a visa for the new visa status.

If you’ve been approved for a change of status but have not obtained a new visa for your new status, you need to make sure to be in possession of your form. I-797 Notice of Approval during your re-entry to the US.

Tip 5: Nonimmigrants should obtain a valid Travel Signature if you’re in an F and J status.

If you are in the F or J status, you should contact your designated school official (DSO) and obtain a travel signature prior to your departure from the U.S.

Note: Depending on your enrollment status, your travel signature may be valid for 1 year (for full-time students) or 6 months (for students on post-completion OPT).

Tip 6: Be polite and courteous when interacting with an airline official or U.S Customs Officer who may not be familiar with the Automatic Visa Revalidation Rule.

If you happen to come across an airline official or U.S Customs Officer who’s not familiar with this rule, you should politely ask to speak with a supervisor or someone more experienced who may be familiar with the automatic visa revalidation rule.

When you make your travel itinerary to return to the U.S using the automatic Visa revalidation rule, you should leave more time in your schedule for clearing customs and immigration.

This way you could exercise patience when dealing with airline representatives and customs officers and not panic about missing your flight.

Frequently asked question on Automatic Visa Revalidation Experience

Below is one commonly and frequently asked question which nonimmigrants travelers do ask:

Question: What can I expect at the U.S Port of Entry when using the automatic revalidation rule?

Answer: Re-entering the U.S Port of Entry using automatic revalidation is very similar to the entry experience of someone with a valid U.S visa.

The U.S Customs and Border Patrol Officer at the Primary Inspection booth would inspect your travel documents and would request you provide any other documents required for your visa to be revalidated.

Be prepared to answer questions about your trip and your nonimmigrant status.

If your primary inspection is successful, your passport will be stamped, indicating a visa revalidation date of the current date.

If you found this guide informative, please make sure you share it to your friends.

DISCLAIMER: This guide and content is designed for general information only and is NOT legal advice. The information presented in this guide should not be construed to be formal legal advice. If you need legal advice, you may contact a licensed attorney.

What To Do If You Receive an RFE on OPT EAD Application (F1 Visa Students)

You’ve just gone through the stress of submitting your I-765 application for your OPT or your STEM-OPT EAD (Employment Authorization Document), and after several weeks of waiting for a response from USCIS, you check the status of your case and you see an update that says that you’ve received a “Request For Evidence” (RFE) from USCIS. That is a disappointing or unpleasant situation.

What To Do If You Receive an RFE on F-1 OPT EAD Application

This guide will cover the following things:

  • In this guide, we are going to be discussing some of the common reasons why F1 students applying for the OPT or STEM-OPT might receive an RFE from USCIS, what you could do to prevent it, and how to respond to an RFE if you receive one.
  • If you’ve received an RFE from USCIS on your OPT or your STEM-OPT application, in this educative guide, you’re going to get some helpful tips that you can follow when responding to your RFE.
  • On the other hand, if you’re an advance student who has yet to apply for your OPT, below in this guide, you’re going to get some helpful tips that you can follow to reduce your chances of receiving an RFE.

What is Request for Evidence (RFE) and what does this document look like?

The Request for Evidence (RFE) is a document issued by USCIS whenever USCIS needs some extra information from you in order to process your immigration case.
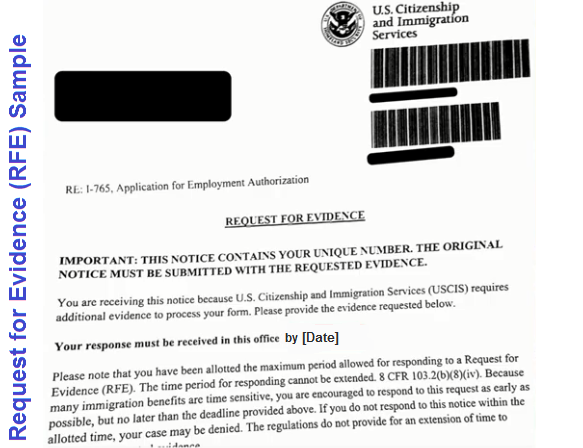
What is Request for Evidence

If you check the status of your case in the USCIS Case Tracking Tool, you will see a status update that says that an RFE has been issued and mailed to you. When you get this letter in the mail, it’s going to have a list of issues that USCIS need you to address in order for the application to be adjudicated.

One of the most important sections of the Request for Evidence (RFE) is the deadline to respond to the RFE, that’s normally contained within the second paragraph on the RFE. You should take a note of this date and ensure that your response to the RFE is received by USCIS before this date is reached.

The main downside of receiving the RFE is that the processing of your OPT or your STEM-OPT application is going to be suspended until USCIS receives your response, and this essentially prolongs the total processing time of your OPT or your STEM-OPT application.

If you’ve got an RFE, you should breathe a sigh of relief knowing that you have a second opportunity to put together a strong application for your OPT or your STEM-OPT application.

Just because you got an RFE does not mean that your initial application is going to be denied. If that were to be the case, USCIS would send you a letter called a “Notice of Intent to Deny”, which is much more difficult to overcome relative to the RFE.

One of the good things about the RFE, if you can say so, is that USCIS would explicitly tell you what documents you need to provide in order for your application to be processed.

And if you can successfully provide the evidence that’s required by USCIS, then you have a higher likelihood of getting your application approved.

Common reasons for receiving a USCIS Request for Evidence (RFE) on the I-765 application for OPT or STEM-OPT

Below are some of the common reasons why F1 students applying for the OPT or the STEM-OPT might receive an RFE from USCIS. Some of these reasons are not particularly obvious.

  1. Passport Photo Issues

The first reason why you might receive an OPT RFE on your OPT application or your STEM-OPT application has to do with not meeting the right requirements for your passport photograph.

The passport photograph that’s taken to support your OPT application needs to be a two inch by two inch colored passport photograph, taken against a white background. This photograph must show a clear image of your face and it should not be photo edited by any means.

If you like to see the correct specifications for your passport photograph used to support your OPT application, visit the U.S Department of State website that explicitly specifies the requirements you must meet for your passport photograph to be accepted.

Another common reason for an OPT RFE could happen when you use a passport photograph that you’ve used on a previous immigration case.

For example, an F1 student who has applied for the 24 months DEMO-OPT extension using the same passport photograph on the initial post Completion OPT application might receive an RFE from USCIS because this would imply that the passport photograph does not meet the six month requirements specified by USCIS.

There is an obvious reason why you could prevent receiving an RFE by making sure that your passport photograph meets all the requirements specified by USCIS. It’s highly recommend that when getting a passport for your OPT or your STEM-OPT application, you should consider getting this done professionally or semi-professionally.

  1. Missing Documents

The second common reason for the OPT RFE is forgetting to provide supporting documents for your OPT application or your STEM-OPT application, respectively.

For example, an F1 student applying for the STEM-OPT extension will be required to provide supporting documents, such as copies of the previous EAD card that was issued for the post completion OPT.

Failing to provide any of these supporting documents could easily lead to an OPT RFE, thereby delaying the length of time it’s going to take you to obtain your EAD card.

If you’re going to be applying for your post completion OPT, you can check [HERE] to a free downloadable PDF checklist that keeps you on track to provide all the required supporting documents when applying for your post completion OPT.

  1. Errors on Form I-20

The third common reason for an OPT RFE is when there are errors on your I-20 endorse for OPT or STEM-OPT by your Designated School Official (DSO). Yes, your designated school official is capable of making mistakes just like anybody else, and that’s why when applying for the OPT, you will need to make sure that you thoroughly review I-20 issued by your DSO, ensuring that there are no inconsistencies.

And if you find any inconsistencies on your I-20, make sure to bring this to the attention of your designated official before submitting a copy of your I-20 as part of your application package.

The thing about requests for evidence issued by USCIS is that they are highly subjective. For example, you can have two applicants applying for the OPT using the exact same documentation, and one applicant receives an RFE while the other applicant does not get an RFE.

So while you might not be able to guarantee with 100% certainty that you’re not going to get an RFE, by following these tips, you can significantly reduce your chances of getting an RFE.

  1. Wrong Employer Info

The fourth reason for an OPT RFE commonly occurs when F1 students are applying for the 24 month DEMO-OPT extension. What’s important about the STEM option is that unlike the initial post completion OPT where you don’t provide any information about your employer, in the case of the STEM-OPT, you’re going to be providing detailed information about your employer on the Form I-98320 Plan and also on the Form I-765.

One major mistake advertisers to make when applying for the 24 months DEMO-OPT Extension is using the incorrect name for the employer.

Most employers operate with DBA names, where DBA stands for “Doing Business As” and commonly these names are different from the actual legal name of the employer.

Another mistake here is that when F1 students are applying for the STEM-OPT Extension, they might use an incorrect E-Verify number for the employer. Without the correct name and E-Verify number of your employer, USCIS would be unable to determine if your employer is enrolled in the E-Verify program and would issue a request for evidence.

So to reduce your chances of receiving an OPT RFE for this reason, you should contact the Human Resource Department of your employer and request that they provide you with the correct evaluation E-Verify number and the correct legal name of the employer.

  1. OPT Reporting Issues

The fifth common and surprising reason why F1 students might receive an OPT RFE is when there are inconsistencies in your reported employment to the Department of Homeland Security.

If during the course of your STEM-OPT extension, USCIS find inconsistencies in your reported OPT employment, an RFE could be issued on your I-765 application.

When you engage in Optional Practical Training (OPT) you’re required to report any changes in your employment to the Student and Exchange Visitor Program (SEVP). Some examples of changes in your employment that you should be reporting are things like when you lose your job or you gain a new job, or when you change from one employer to the other.

If the Student in Action Register Program finds out that there are certain inconsistencies in your employment record, they might issue a request for evidence to make sure that you’ve not violated your status during the course of your OPT.

While the OPT or STEM-OPT RFE is a bummer, it sure does not mean that your application will be rejected. The silver lining here is that you get a 2nd shot to provide a water-tight application to USCIS. Thereby increasing your chances of receiving an approval on your I-765 application.

How to respond to an RFE

The first thing you need to do is to read and understand the reason why the OPT RFE was issued in the first place. And if this doesn’t make sense to you, you should reach out to your school’s designated school official and ask for clarification.

When responding to an RFE, you need to make sure that all the evidence you provide should be included in one single package and mailed to USCIS at the exact same time.

You are also required to submit this original RFE letter alongside the rest of your other supporting documents to USCIS. This original RFE letter should be the first page on the packets that you’re going to be mailing to USCIS.

Before sending this original RFE letter, it’s best to make a copy for your record. Also, when mailing your response to the OPT RFE, you should request a confirmation of delivery from your mailing service provider.

This way, you can track the status of your delivery and guarantee that you have an evidence to show that your OPT RFE response was delivered to USCIS in a timely fashion.

OPT RFE Processing Timeline

You will definitely like to know how long it takes for USCIS to process your response to your OPT RFE.

Usually, USCIS would state in your OPT RFE letter, the length of time that you can expect your OPT application to be processed after they have received your OPT RFE response and if your OPT application is not processed within this time frame, you may contact USCIS and request that they expedite the processing of your OPT application.

I hope you found this information helpful.

DISCLAIMER: This guide and content is designed for general information only and is NOT legal advice. The information presented in this guide should not be construed to be formal legal advice. If you need legal advice, you may contact a licensed attorney.

How to Get a Funded Scholarship to the USA As An International Student

Learn how to get a scholarship to study in the USA for FREE as an international student on an F1/J1 visa. Many international students have a hard time finding scholarships. But there are plenty of them out there if you know where to look. How to get scholarship in USA for international students.

How to get scholarship in USA for international students: In this guide, you will learn how international students like you can find scholarships in the USA that will allow you to study without paying any tuition or taking out student loans. Scholarships are actually a great way to fund your higher education.

How to get scholarship in USA for international students

  • Source of Scholarship

For international students, your main source of scholarship could come from either your home country, whether that’s your home country’s government or private organization in your home country. But there are also opportunities for you to get scholarships on the U.S side.

On the U.S side, you would find that as an international student, the majority of scholarships tend to come from the U.S University that offered you an admission.

But after you’ve come to the U.S and you’ve enrolled in a University, there are also other sources of scholarships that you can get outside of your University, which we are going to cite some examples later.

  • Demographics

Talking about the demographics of international students who get scholarships, it is very important for you to know that when it comes to the demographics, there tends to be a fair balance of international graduate students and international undergraduate students who get scholarships.

  • Coverage

What exactly do these scholarship offers from U.S universities cover? In many cases, the scholarships could cover your tuition, and it could be a case where your tuition is covered in full, which is called a full ride scholarship.

Or it could be a case where your tuition is covered in part, which is called a partially funded scholarship.

So typically, scholarship from U.S universities tend to only cover your tuition and your fees. It’s quite rare to get scholarships that actually pay you a stipend, which tends to be the case for fellowships, as will be discussed later.

  • Duration of Scholarships

If you happen to receive a scholarship, the duration of your scholarship will be specified in an offer letter. And in this duration offer letter, the duration could take different forms.

It could be a one-time offer, which means that you would receive a one-time cash payout towards your tuition and fees. Or it could be a multiple year offer, which means that you might get a scholarship for more than one semester.

The duration of the scholarship is irrespective of the coverage you get in the scholarship.

How difficult it is to get a scholarship to the US as an international student.

  • Competition

So what you would find across many U.S universities is that the availability of scholarships are quite limited. This means that the competition to get a scholarship is quite high. And as an international student, you are expected to fund your education coming to the U.S.

As an example, if you want to be considered for a merit based scholarship at the time you are applying to the U.S University, then you would have to put together a very strong application package. You might ask, what does a strong application package look like?

Well, that’s going to have a very strong GPA coming out of high school or a strong GPA coming out of College. It’s going to have strong letters of recommendations. It’s going to have a high test score. It’s also going to have a strong statement of purpose or strong admission essay.

You should also note that just because you have a high GPA or a high test call, it’s still not a guarantee that the U.S University is going to give you a scholarship offer. So keep that in mind.

  • Timing of offers

Looking at the timing of your scholarship offer as an international student, you might get a scholarship at the time you’re applying to a U.S University. But if you don’t get a scholarship, then all hope isn’t lost, because even after you’ve enrolled in a U.S University, there are still many opportunities for you to get a scholarship.

Out of several examples, below are some examples that you can get a scholarship after you’ve enrolled at a U.S University.

  • Dean’s list

Let’s say after your first year of studies you make a very high GPA and this puts you on the Dean’s list in your program. And your program might have a funding policy where a student who made the Dean’s list could receive a partially funded scholarship or fully funded scholarship.

They could maintain the scholarship for as long as they remain on the Dean’s list.

  • Winning a student competition

Another common example where you might get a scholarship offer after you enrolled at a U.S University could be by you winning a student competition on your University’s campus.

Some of these competitions could be based on extracurricular activities or some of these competitions could be based on research.

So these are just a few examples of opportunities that exist for you to get a scholarship after you’ve enrolled at a U.S University.

  • Benefits and Caveat

Let’s consider the benefits and any caveats of scholarships, especially when compared to the other ways you can fund your U.S education. The benefits are clear as this; scholarships is free money that you never have to pay back if it’s a one-time scholarship. As long as you accept the scholarship, you get the payout.

When it comes to multiple term scholarships, they tend to have an academic requirement where you the international student will have to maintain a certain GPA in order to keep your scholarships.

For the case of undergraduate students, this minimum GPA is about a 2.0 or C average. And for graduate students, this minimum GPA is about a 3.0 or a B average. So as long as your minimum GPA stays above this number, you would have no trouble keeping your multiple term scholarship.

USCIS Biometrics Appointment Tips | What happens after Biometrics Appointment

In this informative guide, you’re going to learn step by step everything you need to know to have a successful USCIS biometrics appointment in 2022. You will also get some really helpful tips for your biometrics appointment that no one talks about. Getting to the USCIS biometrics appointment is an important stage in your immigration journey.

If you’ve applied for an immigration benefit to USCIS, such as an application for a green card or an application for a change of status, you might be required to provide your biometric information as part of your application process.

This educative guide will teach you everything that you can expect at your USCS biometrics appointment, and also some tips that can help you have a good experience at the USCIS Application Support Center, where your biometrics are going to be collected.

What is USCIS biometrics appointment?

Some people worry about what is involved, especially when they hear the word “Biometrics”. You should not scared about the word “Biometrics”.

All this means is that during your appointment, you will be asked to provide information that would be used to verify your identity. This identifiable information to be collected during your appointment will be your fingerprints and your photograph.

By submitting your biometric information, you will be giving USCIS permission to perform a criminal background search on you. And the outcome of this background search will be used to either approve or deny your application.

What you should know about this appointment is that it’s not going to be an interview experience, not even close to that.

All the USCIS biometrics appointment is an opportunity for USCIS to see you in person and to collect some identifiable metrics, such as your fingerprints and a photograph of yourself.

How long does it take for USCIS to send biometrics appointment?

If your USCIS application requires your biometrics information, USCIS will send you a biometrics appointment notice. Usually, you can expect to receive this biometrics notice from USCIS within 12 weeks after you file your immigration application. Although, your wait time will depend on the USCIS service center processing your case.

During this appointment, you don’t have to pay a fee for the collection of your biometrics as you would have already paid this fee at the time you filed your application to USCIS.

Your appointments notice will also come with a worksheet that has to be completed before you attend your biometrics appointment. When you receive the biometrics notice, it’s going to have the location of the USCIS Application Support Center where your biometrics information is going to be collected. It’s also going to have the scheduled date and time of your appointment.

USCIS Biometrics Appointment Notice (Form I-797C)

Something else to pay attention to on this form is a code number that appears on the top right corner. This code number could take the number 1, number 2, or number 3. And these numbers will decide what type of biometric information that you’re going to be required to provide on the day of your appointment.

USCIS Biometrics Appointment code number

You will learn more about the differences between these code numbers, 1, 2, 3, as you read on, but for now, let’s talk about what you should bring during your appointment.

Document Required for the USCIS Biometric Appointment

On the day of your appointment, you’re going to need to have a valid photo identification. This could be a valid driver’s license, it could be your passport, and for certain applicants, a green card could be a required form of identification during your appointment.

You’re also going to need the original copy of your Biometrics Appointment Notice that USCIS sent to you

Due to health and safety precaution, the application support center may not accept walk in appointments. As they need to limit the capacity of visitors within the building at all times.

This was compiled while the Covid-19 Pandemic is still ongoing. So in certain locations, you might be required to bring with you a face covering. Otherwise, you may not be granted access into the building.

So make sure go there with your face mask for your appointment and be prepared to keep this on at all times.

On the day of your appointment, you should plan to get there on time and preferably you should get there about 15 minutes before your scheduled appointment time shown on your appointment notice (or Form I-797C).

WHAT HAPPENS WHEN YOU GET TO THE APPLICATION SUPPORT CENTER (ASC)?

When you show up at the Application Support Center, you’re going to notice signs on the door that tell you that the use of electronic devices are prohibited. So the first thing you should do is to turn off your phone, if you’re going to be taking that into the building.

Once you walk into the building, you’re going to meet a receptionist who’s going to review your photo identification and will also review your biometrics appointments notice.

Once this receptionist confirms your identity and reviews your biometrics appointments notice, you are going to be handed a processing form and the ticket number.

This processing form that will be handed to you is just for the use of the Biometrics Officers and after that you will be asked to take a seat and wait for a Biometrics Officer to call your ticket number.

Once a Biometrics Officer calls you by your ticket number, you will walk up to the Biometrics Officer and hand in all your documents, including the processing form.

The Biometrics Officer will review all your documents and will then enter your information into a computer.

Codes 2 and 3

Depending on the code number that appears on your biometrics appointment notice (Form I-797C), what you’re going to be asked to do at this point is going to vary. You will be asked to scan some or all of your fingers, provide an electronic signature, or have your photo taken.

If your code number states code 2 or 3, a Biometrics Officer will ask you to take a seat where your digital photograph will be taken. And on the other hand, if your code number States code 1, your digital photograph will not be taken.

Scanning of Fingerprints

When it comes to the scanning of your fingerprints, if you have code 1, then you can expect to get all your fingerprints scanned. If you have code 2, you’re only going to have your left and right index fingers scanned. And if you have code number 3, again, just like code 1, you can expect to have all your fingerprints captured.

Don’t worry about making any mistakes with the scanning of your fingerprints as the Biometrics Officer is going to be there to make sure that your fingerprints are properly scanned into the system.

What happens after Biometrics Appointment

After your fingerprints have been scanned, you will be asked to provide your electronic signature. Once this process has been completed, the Biometrics Officer will stamp your form I-797C, marking that your biometrics information has been collected.

USCIS Biometrics Appointment Notice

After that, your job is done and you may leave the Application Support Center. The total time spent during your appointment shouldn’t exceed 20 minutes. But in some cases where you have a lot of people waiting before you, or if you have few Biometrics officers, your appointment time could exceed 20 minutes.

Depending on what your USCIS application, for example, if it’s an adjustment of status application, after the uscis biometrics appointment, you’ll have the green card interview next.

Most of these biometrics offices are very professional and very polite. So you should expect your experience to be quite pleasant. You should understand that by providing your biometrics information to USCIS, you are granting USCIS permission to conduct a criminal background search on you.

If you have a criminal history and you’re worried about the outcome of this background search and how that could affect your immigration application, then it is highly recommend you seek the counseling of an experienced immigration attorney.

Thanks for reading this guide and I hope you found it helpful.

DISCLAIMER: This guide and content is designed for general information only and is NOT legal advice. The information presented in this guide should not be construed to be formal legal advice. If you need legal advice, you may contact a licensed attorney.

error: Content is protected !!