Jobsscholar - Jobs, Jobs Hiring, Job Search Jobsscholar - Part Time Jobs, Jobs, Employment Agency Jobsscholar - Highest Paying Jobs, Job Application, Airport Jobs Jobsscholar - Government Jobs, Jobs Hiring, Find a Job Jobsscholar - Oil & Gas Jobs in Canada, Jobs, Internship

Tag Archives: uscis processing times

Understanding Your Case is Current for Process in DV Lottery Program

What does your case is current for processing mean? Many people ask this question because when they check their status, they receive the notification that their case is ready for processing, their case is current for processing, and they’ve been wondering what does this mean in. This is what will discuss in details in this guide.

When you submit your DS-260 to KCC, KCC normally goes through your DS-260 form to process it. They go through your data to see if it’s correctly filled up and if the information is correct.

Once they have approved your information, they will allocate a visa to your case.

All the DS-260 forms submitted to KCC will undergo this processing and if they are correctly filled up and the information is truthful, then all those will be allocated visas.

After the visa allocation, your status change and it changes to, “Your case is current for processing.”

It means that KCC has already allocated a visa to your case.

Therefore, when many DS-260 are processed, all of them are put in a queue, and this queue is based on the case numbers from the lowest case number up to the highest case numbers. All of the allocated visas will be put in a queue called Allocated Visa queue (AVQ).

This also means that you are ready for the next step, and the next step is the interview, i.e you are ready to be scheduled for an interview

How long does it take from “your case is current for processing” to the interview?

This depends majorly on two aspects:

The first one is, what is the position of your case in the AVQ (Allocated Visa Queue)? Are you in the highest end or are you in the lowest end?

The second aspect is the performance of the embassies i.e your embassy. If your embassy capability is high, if they handle many cases in a month, that definitely means that you can receive your interview scheduling quicker or faster than those whose embassies are slow.

For instance, some embassies are really doing very well in terms of handling many cases per month, but others are unfortunately doing very badly.

Those two factors affect it.

Lastly, a very key thing to note is that, even if your case is current for processing, it does not mean that you must receive your interview. It does not mean that you will be scheduled for the interview. You might be in this status but never receive your interview.

Depending on those two factors discussed above, especially if we are in the last months or the last few months to the end of the fiscal year, you might be in the AVQ or your case is current for processing but never receive your interview because time will have already run out for you.

For instance, in the case of DV 2022, most of them are current for processing, but most of them may not receive their interviews. It may look sad, but that is the fact.

I hope this guide have answered the question.

DISCLAIMER: This post and content is designed for general information only and is NOT legal advice. This site is not offering any Diversity Visa and is not the official site for DV Lottery program. The information presented in this post should not be construed to be formal legal advice.

If you have any questions about the DV lottery, please contact an immigration professional/officer or a licensed attorney.

USCIS New Policy on Removing Conditions on Green Card

In this article, you will learn a new policy by USCIS on green card renewals and removing conditions on green cards.

USCIS has yet again implemented a new policy regarding green card renewals, and in certain cases, USCIS is going to be extending green cards for up to 48 months. There’s some good news to this and some potentially not so good news that will be covered in this article.

New policy from USCIS on Removing Conditions on Green Card

This policy has to do with basically a way that USCIS is going to be extending green cards for certain applicants that need to apply to remove the condition from their green card.

What does this means? In certain cases, people that get their green card get a conditional green card for a period of two years, and at the end of that conditional period of their green card, they are required to apply to remove the condition from their green card.

In particular, there are two classifications of conditional green card holders.

  • For certain people that get their green card through marriage, and
  • for investors that get their green card based on making an investment in a U.S business.

For that certain classification of people that have to apply to remove their condition after they got a conditional green card through marriage, application process requires them to file a form I-751. That’s the application type for people that need to apply to remove the condition from their green card based on getting a conditional green card through marriage.

The second classification of people, the investors, when they need to apply to remove the condition from their green card, they have to file a form I-829.

That’s just for you to know the different processes that are involved and the different categories of people that have to apply to remove the condition from their green card.

As mentioned early, in certain cases, people have to apply to remove the condition from their green card by filing either a form I-751, or a form I-829.

Basically, in both of those cases, the green card is valid for two years. And at the end of that two year period, the person has to apply to remove the condition from the green card.

When the applicant is applying to remove the condition from their green card, what happens when that green card expires and their application to remove the condition to get the permanent green card is still processing? How does that applicant demonstrate proof of valid status in the United States? How do they demonstrate proof of that?

In the past, USCIS has issued a receipt notice. So basically, when you file the Form I-751, or you file the Form I-829, when you submit that application, USCIS will give you a receipt that confirms that they have received your application.

In the past, USCIS has included language on that receipt notice that acts to extend the applicant’s green card. So basically, the applicant can provide their expired green card along with the receipt notice, and that receipt notice has special language that extends the green card beyond the expiration date listed on the green card.

The news is that USCIS has now modified this policy. So now the receipt notice for those applicants will act to extend the green card for 48 months, that’s four years.

New USCIS Policy on Removing Conditions on Green Card
USCIS New Policy on Removing Conditions on Green Card

The good news is that ultimately, this is a benefit to conditional green card holders, because essentially, USCIS is now extending the period of time that the receipt notice will act to extend the conditional green card. It’s now 48 months.

So that receipt notice that USCIS will issue will now act to extend the green card for 48 months from the date of the expiration on the green card. And ultimately, that’s a benefit.

Although this is potentially not such great news, USCIS is doing this because processing times for the form I-751, and the form I-829, they’ve increased over the last year.

Ideally, these processing times would go down, so that there would be no need for this policy to be implemented. But unfortunately, as USCIS clearly mentions in the update, over the last year, these processing times have increased.

And the reason for the need for this protocol and this updated policy is to account for the fact that these processing times have gone up. So from that standpoint, it’s potentially not the best news.

That’s the update. This new policy has been implemented where applicants for Form I-751, and applicants for Form I-829 that are properly filing these forms, when they get the receipt notice from USCIS, it will act to extend the green card for 48 months from the date of the expiration on the green card.

I hope you found this information very valuable and you learned a lot from this article.

Source: Ashoori Law

DISCLAIMER: This article and content is designed for general information only and is NOT legal advice. The information presented in this article should not be construed to be formal legal advice nor the formation of a lawyer/client relationship.

The information presented in this article does not create an attorney-client relationship nor is it a solicitation to offer legal advice. If you need legal advice, you should seek the advice of an attorney in your jurisdiction before taking any legal action.

E-2 Visa | How Long is the E-2 Visa valid for?

In this guide, we will learn how to check how long your E-2 visa will be valid for.

If you’re interested in pursuing an E-2 investor visa, this is definitely a guide that you want to stick around for. Make sure to read this guide until the end.

Not all E-2 visas are valid for the same length of time, and not all E-2 visas have the same terms regarding your ability to enter and exit the country.

How long is E-2 visa valid?

Below are some helpful tips that you should know about.

The E-2 visa is an investor visa. It’s a nonimmigrant visa. It allows somebody to invest in a U.S business. They can either start a brand new business or they can invest in an existing business, and based on making an investment, the person can live in the United States and they can operate their business.

The E-2 visa can be a wonderful option for entrepreneurs, investors, people looking to grow their business in the United States and to pursue the American dream.

The E-2 visa is only available to citizens of certain countries that have an E-2 treaty with the United States. There’s many countries that have E-2 treaties with the United States, like Canada, Germany, France, and there’s many countries.

But there are also certain major countries that do not have an E-2 treaty with the United States, like china, Brazil, and Russia.

The first step when deciding to pursue an E-2 visa is  to be from a country that has an E-2 treaty with the United States. Unless you’re planning on getting citizenship to a country that has an E-2 treaty with the U.S.

E-2 visas can be different for citizens of different countries, and what can vary from country to country is the length of the visa and the number of entries that are authorized on the particular visa, and this is depending on the applicant’s country of citizenship.

How long is E-2 visa valid in Canada?

For example, if somebody is a citizen of Canada and they’re going to apply for an E-2 visa, they are eligible to receive an E-2 visa with a validity period of 60 months, that’s five years.

In addition, the visa that is issued to Canadians that are applying for an E-2 visa is a multiple entry visa, meaning that that person can exit and enter multiple times. That is for a citizen of Canada that’s applying for an E-2 visa.

However, a citizen of another country, for example, a citizen of Jordan is issued an E-2 visa for a maximum period of three months, and that E-2 visa from Jordan only allows a single entry.

So what this means practically is that, a citizen of Jordan that’s applying for an E-2 visa, gets a visa that’s authorized for a maximum of three months, meaning that they have three months to enter the United States with that visa, and that visa only authorizes one entry to the United States.

So once they enter, if they leave after that, they can no longer use that same visa to re-enter the United States.

This is so important because depending on your country of citizenship, it will determine extremely important details about your E-2 visa.

How to check how long your E-2 visa can potentially be valid for

To check the terms of your E-2 visa or what type of an E-2 visa you’re eligible for;

Go to Google and type “Visa Reciprocity”

Click on the first result that comes up, and it should be from travel.State.Gov. It says U.S Visa reciprocity and civil documents by country.

You’re going to be taken to a page were you will see a list of letters. The letter that you click on is going to show you the countries that have their first letter starting with that letter.

For example, for a Canadian citizen to check the terms of a potential E-2 visa that they’d be eligible for, Select C for Canada, you will see Canada, Click Canada and you will see the Canada reciprocity schedule.

Scroll down and you are going to have visa classifications. There you will see the visa that start with ABCD, etc. For E2 visa, click on E, you’re going to have the E-1, E-2 and the E-2C.

To check for E-2 scroll along and it’s going to show you the fee, the number of entries and the validity period. For Canada, the validity period is 60 months or five years and the number of entries is multiple.

Again, the validity period is generally how long the visa is valid for. When you get the visa stamped in your passport, how long will that visa be valid for? For Canada, it’s 60 months and the number of entries is multiple.

Follow these procedures to check any country of yours.

It’s very important to check the visa reciprocity based on your country of citizenship.

I hope you found this guide/information very useful.

DISCLAIMER: This post/guide and content is designed for general information only and is NOT legal advice. This site is not offering any legal advice. If you need legal advice, you should seek the advice of an attorney in your jurisdiction before taking any legal action.

The information presented in this post/guide should not be construed to be formal legal advice. As such, I disclaim all liability with respect to actions taken based on any information presented.

Nothing herein is intended to nor constitutes a guarantee, warranty, or prediction regarding the outcome of your legal matter. Every case is different and outcomes will vary depending on the unique facts and legal issues of your case. Thank you.

USCIS to Speed Up Processing Times

Recently, USCIS announced some plans that it has to improve processing times for immigration applications and to reduce the major backlogs that they currently have.

This guide will talk about some updates that USCIS recently announced about its efforts and its plans to improve processing times.

On March 29, USCIS put out a news release in terms of what steps it plans on taking to help reduce processing times. The first thing that USCIS mentioned is that it’s going to attempt to improve its cycle times.

Basically, USCIS has this internal metric, this internal figure that they track that they refer to as a cycle time, which is essentially their way of identifying how long they expect the case to take.

The way that USCIS explained how it plans to reduce its cycle times is that they’re going to create new goals for what they want their new cycle times to be. They’re going to attempt to achieve those goals by increasing staffing, improving their technology, and in general, just increasing their overall capacity. With these changes, they expect to reduce their overall processing times.

Basically, what we’re looking at here is specific forms and what they want their goals to be for the overall processing time of these forms. For example, the form I-129, they’re projecting their goal to be two weeks with premium processing.

Form I-140

Form I-140, it’s another immigrant petition with premium processing. They’re also expecting it to be at around two weeks.

The Form I-129

For the non-premium, I-129, currently for many application types, under the current processing times, it could take anywhere from six months to eight months, or maybe even more.

But under this new goal that they’re setting for themselves, they are planning to get these I-129 processed without premium processing in two months.

Again, on three month category, we have the form I-765, which is the Application for Employment Authorization.

The Form I-131

There is form I-131, which is the form that somebody would use to apply for advanced parole, and other forms which they are planning their goal is to get these processed within three months. Before now, those forms are on six months plus period.

The N-400

The N-400, this is the Application for Naturalization. This is the application that somebody uses to apply for citizenship. These cases take nine to twelve or more months for these to get processed but USCIS is planning to get these processed within six months.

The Form I-485

The form I-485, which is the adjustment of status. This can take nine to twelve to 14 or more months. USCIS plans to get these processed within six months. And there’s more really impressive goals as well.

The form I-526

The form I-526 is the immigrant petition for somebody that’s planning on applying for an EB-5 investor visa. The form I-526 right now can take 18 or more months to process. It’s one of those forms that just takes a tremendously long time to process.

USCIS has set a goal to get these processed within six months. If that can actually happen, it would be a tremendous improvement from the current processing time.

If USCIS can actually leverage technology, increase its workforce, and increase its overall capacity to achieve these goals, it would be a tremendous benefit for people that are planning on applying for immigration benefits.

Above are just one of the sections of this news release that USCIS put out.

In addition to that, in addition to its overall plan of improving its Processing Times by tweaking its Internal Cycle Time Goals, in its latest news release, USCIS announced that it plans to expand the premium processing service.

Premium processing is an optional additional service that somebody can select to do, and it’s only available for certain cases.

What USCIS is announcing is that they plan to expand the types of cases that are eligible for premium processing. So basically, if there are more types of cases that are available and eligible for premium processing, it means that more people can take advantage of this service to get their cases processed in 15 days.

So among the various case types that USCIS plans to make eligible for premium processing are the EB-1C immigrant petition, which is a green card option for multinational managers and executives.

Basically, it’s a certain case type where somebody that’s working as a manager or an executive for a foreign company can transfer to a related company in the US, and also work as either a manager or executive.

In addition, USCIS plans to eventually make the EB-2 national Interest Waiver eligible for premium processing. The national interest waiver is a special green card option for somebody that’s going to be doing some sort of work in the United States that’s in the national interest, for example, like a cancer researcher or a doctor or some other type of professional that’s going to be doing something in the United States that’s in the national interest.

Again, the goal is that by making more case types eligible for premium processing, more people can get their cases processed faster.

Another point that was mentioned by USCIS in this news release is that it plans to make employment authorization documents more available to immigrants that are applying for them.

For example, they are working to extend the validity period of certain types of employment authorization documents, also known as EADs. They plan to improve overall processing times for Employment Authorization applications, along with other steps as well.

In Summary

USCIS has announced a multi-step kind of plan or a multi-pronged plan for improving processing times for immigration cases, for reducing overall backlogs, and in general, making immigration cases move faster.

The three items that were mentioned were that USCIS plans to improve its cycle time goals, and with that, eventually get to a point where actual processing times are improved by increasing staffing, better utilization of technology, and overall increasing the capacity that USCIS has.

In addition, USCIS is planning on expanding the types of cases that are eligible for premium processing, and USCIS plans to improve access to employment authorization documents.

I hopefully you found this information very helpful.

DISCLAIMER: This guide/article and content is designed for general information only and is NOT legal advice. The information presented in this guide/article should not be construed to be formal legal advice nor the formation of a lawyer/client relationship. The information presented in this guide/article does not create an attorney-client relationship nor is it a solicitation to offer legal advice. If you need legal advice, you may contact an attorney. You should seek the advice of an attorney in your jurisdiction before taking any legal action.

What to do After Applying for OPT EAD with USCIS (F1 Visa Employment Guide)

Are you an F1 visa student who has applied for the OPT EAD? In this guide, you will learn what to expect after mailing your OPT EAD application to USCIS, what to do after applying for your OPT EAD and how long to get USCIS receipt notice.

If you have successfully submitted your OPT application to USCIS, as discussed in this guide (How To Apply For OPT EAD), you might be wondering what are the next steps to follow after submitting your OPT. In this guide, you will learn what you can do and what to expect after you’ve applied for your OPT.

Note: After applying for OPT, you are not allowed to start working until you have received our EAD card and the “valid from” date on your EAD card has been reached.

What to do After Applying for OPT EAD with USCIS

  1. Tracking Delivery of OPT EAD Application

The very first thing to do is to track the delivery status of your OPT application. If you’ve mailed your OPT application, you should have requested the tracking number from your career service provider.

With this tracking number, you should be able to track the confirmation of delivery of your OPT application to USCIS.

If you experience any delays with the delivery of your OPT application, you should quickly contact the customer service rep of your career service provider or USPS.

Once you’ve confirmed the delivery of your OPT application on your current service provider’s website, keep a copy of this delivery confirmation for your records.

If you’ve paid for the OPT application fee using your personal check, keep an eye out on your bank account records just to see if USCIS has processed your OPT application fee.

  1. Await Receipt of Form I-797C

Once you’ve confirmed the delivery of your OPT application, the next step is to await the receipt of a form called the Form I-797C Notice of Action. This form will be sent by USCIS.

Typically, you can expect to receive this Form I 797 C in about four weeks, and in some cases it might take slightly longer than four weeks.

But nevertheless, you should not panic if you have not received your Form I-797C after four weeks of the confirmation of delivery of your OPT application.

Usually, if you’ve paid for your opt application fee using a personal check, you can tell that USCIS has pre-processed your OPT application. If your bank account records can show that your OPT application fee has been cashed by USCIS.

On the top left corner of Form I-797-C, you would find your receipt number and with this receipt number, you can track the status of your case on the USCIS case tracking website. Read this guide (4 BEST Ways to Track/Check Your USCIS Case Status Online) to know the full detail about the four best ways of tracking your case status with USCIS.

  1. Await Notice of Approval and EAD Card

If you’re successful with your opt application on the Case Status tracking website, your case status will indicate that your OPT has been approved.

Next, USCIS will mail you a Form I 797 Notice of Approval, followed by your Employment Authorization Document card. This Form I 797 Notice of Approval, will arrive in the mail before you receive your EAD card.

Responding to a USCIS RFE

In the unfortunate circumstance that your OPT application requires more investigation by USCIS, USCIS will send you a letter called a Request for Evidence (RFE). On this Request for Evidence, USCIS will explicitly define what documents you need to provide in order for your case to be adjudicated.

If you received a request for evidence from USCIS, make sure to contact your school’s international office as soon as possible, to proceed with next steps.

It is very important that when you respond to an RFE, make sure to submit all the requested documents by USCIS in a single mail.

  1. Submitting Copies of EAD Card to your DSO

Finally, once you’ve received your ID card in the mail, make sure that information listed on the EAD Card is correct. And once that’s correct, make a copy of the front and back of the ID card and send that to your school’s international office.

You should also note that you’re not allowed to start working on OPT until the start date listed on your ID card is “Current”. Failing to do so will result in you violating your OPT status and your OPT could be terminated.

Those are what to do After Applying for OPT EAD with USCIS.

Frequent Questions About OPT EAD and Answers

Question: After getting your EAD and signing a job contract, who do you send your offer letter to?

Answer: For the OPT, you are only required to report your employment to the Student and Exchange Visitor Program (SEVP). Usually, there is no obligation here to show your offer letter for confirmation. You simply state the employer name, address, job role, and pay for your employment.

DISCLAIMER: This guide and content is designed for general information only and is NOT legal advice. The information in this guide should not be construed to be formal legal advice. For legal advice, you should consult an attorney.

What To Do If You Receive an RFE on OPT EAD Application (F1 Visa Students)

You’ve just gone through the stress of submitting your I-765 application for your OPT or your STEM-OPT EAD (Employment Authorization Document), and after several weeks of waiting for a response from USCIS, you check the status of your case and you see an update that says that you’ve received a “Request For Evidence” (RFE) from USCIS. That is a disappointing or unpleasant situation.

What To Do If You Receive an RFE on F-1 OPT EAD Application

This guide will cover the following things:

  • In this guide, we are going to be discussing some of the common reasons why F1 students applying for the OPT or STEM-OPT might receive an RFE from USCIS, what you could do to prevent it, and how to respond to an RFE if you receive one.
  • If you’ve received an RFE from USCIS on your OPT or your STEM-OPT application, in this educative guide, you’re going to get some helpful tips that you can follow when responding to your RFE.
  • On the other hand, if you’re an advance student who has yet to apply for your OPT, below in this guide, you’re going to get some helpful tips that you can follow to reduce your chances of receiving an RFE.

What is Request for Evidence (RFE) and what does this document look like?

The Request for Evidence (RFE) is a document issued by USCIS whenever USCIS needs some extra information from you in order to process your immigration case.

What is Request for Evidence

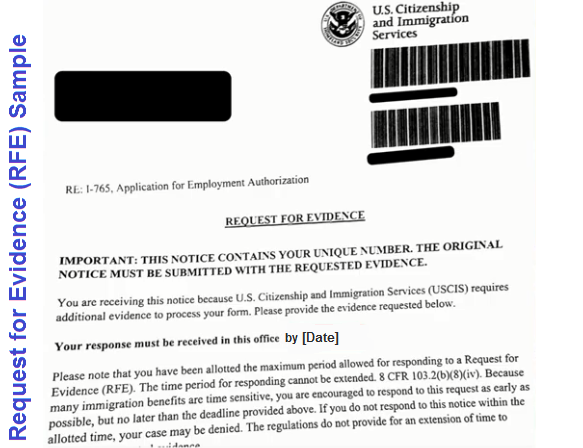
If you check the status of your case in the USCIS Case Tracking Tool, you will see a status update that says that an RFE has been issued and mailed to you. When you get this letter in the mail, it’s going to have a list of issues that USCIS need you to address in order for the application to be adjudicated.

One of the most important sections of the Request for Evidence (RFE) is the deadline to respond to the RFE, that’s normally contained within the second paragraph on the RFE. You should take a note of this date and ensure that your response to the RFE is received by USCIS before this date is reached.

The main downside of receiving the RFE is that the processing of your OPT or your STEM-OPT application is going to be suspended until USCIS receives your response, and this essentially prolongs the total processing time of your OPT or your STEM-OPT application.

If you’ve got an RFE, you should breathe a sigh of relief knowing that you have a second opportunity to put together a strong application for your OPT or your STEM-OPT application.

Just because you got an RFE does not mean that your initial application is going to be denied. If that were to be the case, USCIS would send you a letter called a “Notice of Intent to Deny”, which is much more difficult to overcome relative to the RFE.

One of the good things about the RFE, if you can say so, is that USCIS would explicitly tell you what documents you need to provide in order for your application to be processed.

And if you can successfully provide the evidence that’s required by USCIS, then you have a higher likelihood of getting your application approved.

Common reasons for receiving a USCIS Request for Evidence (RFE) on the I-765 application for OPT or STEM-OPT

Below are some of the common reasons why F1 students applying for the OPT or the STEM-OPT might receive an RFE from USCIS. Some of these reasons are not particularly obvious.

  1. Passport Photo Issues

The first reason why you might receive an OPT RFE on your OPT application or your STEM-OPT application has to do with not meeting the right requirements for your passport photograph.

The passport photograph that’s taken to support your OPT application needs to be a two inch by two inch colored passport photograph, taken against a white background. This photograph must show a clear image of your face and it should not be photo edited by any means.

If you like to see the correct specifications for your passport photograph used to support your OPT application, visit the U.S Department of State website that explicitly specifies the requirements you must meet for your passport photograph to be accepted.

Another common reason for an OPT RFE could happen when you use a passport photograph that you’ve used on a previous immigration case.

For example, an F1 student who has applied for the 24 months DEMO-OPT extension using the same passport photograph on the initial post Completion OPT application might receive an RFE from USCIS because this would imply that the passport photograph does not meet the six month requirements specified by USCIS.

There is an obvious reason why you could prevent receiving an RFE by making sure that your passport photograph meets all the requirements specified by USCIS. It’s highly recommend that when getting a passport for your OPT or your STEM-OPT application, you should consider getting this done professionally or semi-professionally.

  1. Missing Documents

The second common reason for the OPT RFE is forgetting to provide supporting documents for your OPT application or your STEM-OPT application, respectively.

For example, an F1 student applying for the STEM-OPT extension will be required to provide supporting documents, such as copies of the previous EAD card that was issued for the post completion OPT.

Failing to provide any of these supporting documents could easily lead to an OPT RFE, thereby delaying the length of time it’s going to take you to obtain your EAD card.

If you’re going to be applying for your post completion OPT, you can check [HERE] to a free downloadable PDF checklist that keeps you on track to provide all the required supporting documents when applying for your post completion OPT.

  1. Errors on Form I-20

The third common reason for an OPT RFE is when there are errors on your I-20 endorse for OPT or STEM-OPT by your Designated School Official (DSO). Yes, your designated school official is capable of making mistakes just like anybody else, and that’s why when applying for the OPT, you will need to make sure that you thoroughly review I-20 issued by your DSO, ensuring that there are no inconsistencies.

And if you find any inconsistencies on your I-20, make sure to bring this to the attention of your designated official before submitting a copy of your I-20 as part of your application package.

The thing about requests for evidence issued by USCIS is that they are highly subjective. For example, you can have two applicants applying for the OPT using the exact same documentation, and one applicant receives an RFE while the other applicant does not get an RFE.

So while you might not be able to guarantee with 100% certainty that you’re not going to get an RFE, by following these tips, you can significantly reduce your chances of getting an RFE.

  1. Wrong Employer Info

The fourth reason for an OPT RFE commonly occurs when F1 students are applying for the 24 month DEMO-OPT extension. What’s important about the STEM option is that unlike the initial post completion OPT where you don’t provide any information about your employer, in the case of the STEM-OPT, you’re going to be providing detailed information about your employer on the Form I-98320 Plan and also on the Form I-765.

One major mistake advertisers to make when applying for the 24 months DEMO-OPT Extension is using the incorrect name for the employer.

Most employers operate with DBA names, where DBA stands for “Doing Business As” and commonly these names are different from the actual legal name of the employer.

Another mistake here is that when F1 students are applying for the STEM-OPT Extension, they might use an incorrect E-Verify number for the employer. Without the correct name and E-Verify number of your employer, USCIS would be unable to determine if your employer is enrolled in the E-Verify program and would issue a request for evidence.

So to reduce your chances of receiving an OPT RFE for this reason, you should contact the Human Resource Department of your employer and request that they provide you with the correct evaluation E-Verify number and the correct legal name of the employer.

  1. OPT Reporting Issues

The fifth common and surprising reason why F1 students might receive an OPT RFE is when there are inconsistencies in your reported employment to the Department of Homeland Security.

If during the course of your STEM-OPT extension, USCIS find inconsistencies in your reported OPT employment, an RFE could be issued on your I-765 application.

When you engage in Optional Practical Training (OPT) you’re required to report any changes in your employment to the Student and Exchange Visitor Program (SEVP). Some examples of changes in your employment that you should be reporting are things like when you lose your job or you gain a new job, or when you change from one employer to the other.

If the Student in Action Register Program finds out that there are certain inconsistencies in your employment record, they might issue a request for evidence to make sure that you’ve not violated your status during the course of your OPT.

While the OPT or STEM-OPT RFE is a bummer, it sure does not mean that your application will be rejected. The silver lining here is that you get a 2nd shot to provide a water-tight application to USCIS. Thereby increasing your chances of receiving an approval on your I-765 application.

How to respond to an RFE

The first thing you need to do is to read and understand the reason why the OPT RFE was issued in the first place. And if this doesn’t make sense to you, you should reach out to your school’s designated school official and ask for clarification.

When responding to an RFE, you need to make sure that all the evidence you provide should be included in one single package and mailed to USCIS at the exact same time.

You are also required to submit this original RFE letter alongside the rest of your other supporting documents to USCIS. This original RFE letter should be the first page on the packets that you’re going to be mailing to USCIS.

Before sending this original RFE letter, it’s best to make a copy for your record. Also, when mailing your response to the OPT RFE, you should request a confirmation of delivery from your mailing service provider.

This way, you can track the status of your delivery and guarantee that you have an evidence to show that your OPT RFE response was delivered to USCIS in a timely fashion.

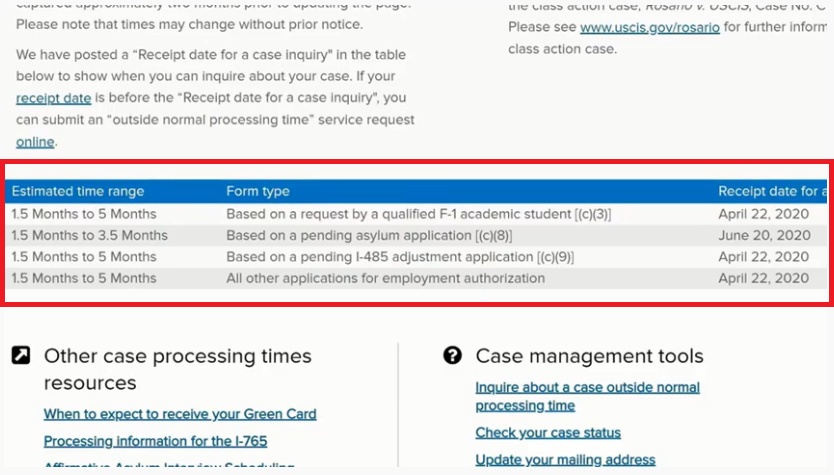
OPT RFE Processing Timeline

You will definitely like to know how long it takes for USCIS to process your response to your OPT RFE.

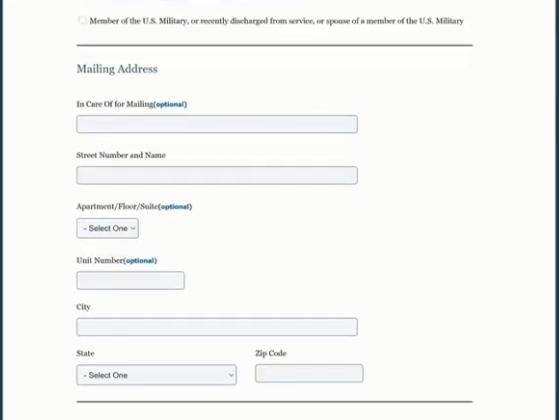
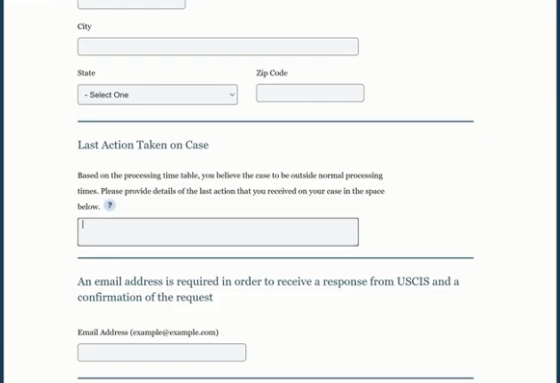
Usually, USCIS would state in your OPT RFE letter, the length of time that you can expect your OPT application to be processed after they have received your OPT RFE response and if your OPT application is not processed within this time frame, you may contact USCIS and request that they expedite the processing of your OPT application.

I hope you found this information helpful.

DISCLAIMER: This guide and content is designed for general information only and is NOT legal advice. The information presented in this guide should not be construed to be formal legal advice. If you need legal advice, you may contact a licensed attorney.

USCIS Biometrics Appointment Tips | What happens after Biometrics Appointment

In this informative guide, you’re going to learn step by step everything you need to know to have a successful USCIS biometrics appointment in 2022. You will also get some really helpful tips for your biometrics appointment that no one talks about. Getting to the USCIS biometrics appointment is an important stage in your immigration journey.

If you’ve applied for an immigration benefit to USCIS, such as an application for a green card or an application for a change of status, you might be required to provide your biometric information as part of your application process.

This educative guide will teach you everything that you can expect at your USCS biometrics appointment, and also some tips that can help you have a good experience at the USCIS Application Support Center, where your biometrics are going to be collected.

What is USCIS biometrics appointment?

Some people worry about what is involved, especially when they hear the word “Biometrics”. You should not scared about the word “Biometrics”.

All this means is that during your appointment, you will be asked to provide information that would be used to verify your identity. This identifiable information to be collected during your appointment will be your fingerprints and your photograph.

By submitting your biometric information, you will be giving USCIS permission to perform a criminal background search on you. And the outcome of this background search will be used to either approve or deny your application.

What you should know about this appointment is that it’s not going to be an interview experience, not even close to that.

All the USCIS biometrics appointment is an opportunity for USCIS to see you in person and to collect some identifiable metrics, such as your fingerprints and a photograph of yourself.

How long does it take for USCIS to send biometrics appointment?

If your USCIS application requires your biometrics information, USCIS will send you a biometrics appointment notice. Usually, you can expect to receive this biometrics notice from USCIS within 12 weeks after you file your immigration application. Although, your wait time will depend on the USCIS service center processing your case.

During this appointment, you don’t have to pay a fee for the collection of your biometrics as you would have already paid this fee at the time you filed your application to USCIS.

Your appointments notice will also come with a worksheet that has to be completed before you attend your biometrics appointment. When you receive the biometrics notice, it’s going to have the location of the USCIS Application Support Center where your biometrics information is going to be collected. It’s also going to have the scheduled date and time of your appointment.

USCIS Biometrics Appointment Notice (Form I-797C)

Something else to pay attention to on this form is a code number that appears on the top right corner. This code number could take the number 1, number 2, or number 3. And these numbers will decide what type of biometric information that you’re going to be required to provide on the day of your appointment.

USCIS Biometrics Appointment code number

You will learn more about the differences between these code numbers, 1, 2, 3, as you read on, but for now, let’s talk about what you should bring during your appointment.

Document Required for the USCIS Biometric Appointment

On the day of your appointment, you’re going to need to have a valid photo identification. This could be a valid driver’s license, it could be your passport, and for certain applicants, a green card could be a required form of identification during your appointment.

You’re also going to need the original copy of your Biometrics Appointment Notice that USCIS sent to you

Due to health and safety precaution, the application support center may not accept walk in appointments. As they need to limit the capacity of visitors within the building at all times.

This was compiled while the Covid-19 Pandemic is still ongoing. So in certain locations, you might be required to bring with you a face covering. Otherwise, you may not be granted access into the building.

So make sure go there with your face mask for your appointment and be prepared to keep this on at all times.

On the day of your appointment, you should plan to get there on time and preferably you should get there about 15 minutes before your scheduled appointment time shown on your appointment notice (or Form I-797C).

WHAT HAPPENS WHEN YOU GET TO THE APPLICATION SUPPORT CENTER (ASC)?

When you show up at the Application Support Center, you’re going to notice signs on the door that tell you that the use of electronic devices are prohibited. So the first thing you should do is to turn off your phone, if you’re going to be taking that into the building.

Once you walk into the building, you’re going to meet a receptionist who’s going to review your photo identification and will also review your biometrics appointments notice.

Once this receptionist confirms your identity and reviews your biometrics appointments notice, you are going to be handed a processing form and the ticket number.

This processing form that will be handed to you is just for the use of the Biometrics Officers and after that you will be asked to take a seat and wait for a Biometrics Officer to call your ticket number.

Once a Biometrics Officer calls you by your ticket number, you will walk up to the Biometrics Officer and hand in all your documents, including the processing form.

The Biometrics Officer will review all your documents and will then enter your information into a computer.

Codes 2 and 3

Depending on the code number that appears on your biometrics appointment notice (Form I-797C), what you’re going to be asked to do at this point is going to vary. You will be asked to scan some or all of your fingers, provide an electronic signature, or have your photo taken.

If your code number states code 2 or 3, a Biometrics Officer will ask you to take a seat where your digital photograph will be taken. And on the other hand, if your code number States code 1, your digital photograph will not be taken.

Scanning of Fingerprints

When it comes to the scanning of your fingerprints, if you have code 1, then you can expect to get all your fingerprints scanned. If you have code 2, you’re only going to have your left and right index fingers scanned. And if you have code number 3, again, just like code 1, you can expect to have all your fingerprints captured.

Don’t worry about making any mistakes with the scanning of your fingerprints as the Biometrics Officer is going to be there to make sure that your fingerprints are properly scanned into the system.

What happens after Biometrics Appointment

After your fingerprints have been scanned, you will be asked to provide your electronic signature. Once this process has been completed, the Biometrics Officer will stamp your form I-797C, marking that your biometrics information has been collected.

USCIS Biometrics Appointment Notice

After that, your job is done and you may leave the Application Support Center. The total time spent during your appointment shouldn’t exceed 20 minutes. But in some cases where you have a lot of people waiting before you, or if you have few Biometrics officers, your appointment time could exceed 20 minutes.

Depending on what your USCIS application, for example, if it’s an adjustment of status application, after the uscis biometrics appointment, you’ll have the green card interview next.

Most of these biometrics offices are very professional and very polite. So you should expect your experience to be quite pleasant. You should understand that by providing your biometrics information to USCIS, you are granting USCIS permission to conduct a criminal background search on you.

If you have a criminal history and you’re worried about the outcome of this background search and how that could affect your immigration application, then it is highly recommend you seek the counseling of an experienced immigration attorney.

Thanks for reading this guide and I hope you found it helpful.

DISCLAIMER: This guide and content is designed for general information only and is NOT legal advice. The information presented in this guide should not be construed to be formal legal advice. If you need legal advice, you may contact a licensed attorney.

How to apply for a Social Security Number (SSN) as an F1 visa or J1 visa international student

Social Security Number for international students: In this guide, we will learn how to apply for a social security number (SSN) as an F1 visa or J1 visa international student. We will also learn how to obtain an SSN Letter of Ineligibility for someone unable to obtain an SSN as an F1 or J1 visa non-immigrant.

Social Security Numbers (SSN) are 9 digit numbers primarily used to report an individual’s wages to the U.S government through the Internal Revenue Service (IRS) and to determine if a person is eligible to obtain a Social Security benefit.

Why You Need an Social Security Numbers (SSN)

As an international student on an F1 or J1 visa, you will need a Social Security Number or an SSN to do the following;

  1. Receiving income and paying taxes on a job
  2. Receiving government benefits, if you are considered a resident alien for tax purposes
  3. Applying for a driver’s license or a state ID
  4. Opening financial accounts, such as credit card accounts, and online banking accounts
  5. Applying for loans, such as student loans, or car loans

Requirement for Social Security Numbers (SSN) on F1/J1 Visa

There are two prerequisites, either of which must be met in order to obtain a Social Security Card as an international student;

  • You must be authorized for employment by your school’s designated school official for F1 student, and if you’re a J1 student, you must be authorized for employment by your sponsor.

This authorization usually occurs when F1 Student or J1 Student apply for on campus employment or off campus employment in the form of CPT or academic training.

  • When you obtain a work authorization from the Department of Homeland Security (DHS), which is the case for F1 international students who apply and are approved for the Optional Practical Training OPT

How to get Social Security Number for International Students

Applying for your Social Security Number (SSN) is absolutely free, and if you’ve met any of the prerequisites listed above, you may contact your local Social Security Administration office and schedule an appointment as a first time Social Security number applicant.

You would first need to complete an application for a Social Security card, as well as presenting original documents that can be used to prove your identity, your age, your work eligibility, and your U.S immigration status.

Documents required for SSN for F1 students

As an international student applying for your first time Social Security Number, it’s best to go along with you the following documents. These document include;

  • An unexpired and most recent admissions stamp foreign passport, which could be used to prove your identity and your age.
  • Foreign birth certificate (optional): If you have one, you can go with your foreign birth certificate that could be used to prove your age.
  • I-94 arrival/departure record
  • Form I-20 (F1 students)
  • DS-2019 (J1 students)

These documents will be needed to prove your immigration status.

Supplementary Documents

  • Letters of work authorization from your DSO or Sponsor (F1 students who plan to work on campus)
  • Evidence of employment from your employer (This evidence of employment could be in the form of an awful letter or page stub)
  • J1 students must also provide a letter from their sponsor authorizing them for employment.
  • A valid EAD card (F1 students who plan to work in OPT)
  • An F1 student who plans to work in CPT must present an I-20 endorsed for CPT by their designated school official

Note: Your on campus or CPT work must begin within 30 days from the date you apply for your SSN, in order for your SSN application to be processed.

Another way an international student can apply for the Social Security Number for the first time, is when an F1 student is applying for the Optional Practical Training (OPT) on the I-765 application form used to apply for the OPT EAD.

You can choose the option to apply for your Social Security Number. If you choose the option of applying for your Social Security Number when you complete your OPT application, then when USCIS approves your OPT application, you will also receive a Social Security card from the Social Security Administration Office.

Approved SSN Card

Once your application has been approved, your card containing the 9-digit SSN would be mailed to the address you listed on your application.

If you look at your SSN card, you would see an annotation on this card stating “Valid for Work Only with DHS Authorization”.

This ensures that your future employer verifies that you have received the legal authorization to work in the US before employing you.

Social Security Number (SSN) Denial Letter

F1 and J1 international students who do not have the work authorization or do not intend to work in the U.S can request a denial letter by visiting the Social Security Administration Office.

This letter is also called a Social Security Number Letter of Ineligibility (Form SSA-L676) and as the name implies, it States that the individual is not eligible to obtain a Social Security Number.

Requesting this letter does not affect your ability to obtain a Social Security Number in the future. In some. This letter may then be used to apply for a driver’s license or a state ID in some U.S States that accept this letter in place of a social security card.

In Summary

I believe by now, you have learned why you need a Social Security Number (SSN) and how you can obtain one as an F1 or J1 visa International Student. Also, I believe you have learned what you can do if you are ineligible to obtain a Social Security Number (SSN).

Thanks for reading this detailed guide on social security number for international students.

DISCLAIMER: This guide and content is designed for general information only and is NOT legal advice. The information presented in this guide should not be construed to be formal legal advice. If you need legal advice, you may contact a licensed attorney.

How To Get Help From Your Congressman To Speed Up USCIS Immigration Application

The USCIS Immigration application process is long and requires patience. Understanding How to Get Help From Your Congressman To Speed Up USCIS Immigration Application and Sample letter to congressman asking for immigration assistance is what this guide will focus mainly on.

When you hear the word congressman, you might be saying “but I’m not a U.S citizen”, “How am I supposed to contact the congressman?” What you need to understand is that a congressman is there to represent everyone who lives in your district, be that foreign nationals or U.S citizens.

Generally, when you contact the office of your congressman, you’re going to be asking them to help you speed up your case with USCIS. Given that USCIS is a U.S federal agency that falls under the direct oversight of Congress, your Congressman has a lot of leverage to get USCIS to take action on your case.

In many cases, the process of contacting your congressman to help speed up your case with USCIS could be as easy as visiting your congressman’s website. Let’s take a look at some examples of how to do this.

How To Get Help From Your Congressman To Speed Up USCIS Immigration Application

The first thing to do is to determine the congressman who represents your district.

  • To do that, visit www.govtrack.us

On the homepage of this website, click on “Legislators” and select “Members of Congress” and on this webpage under “Find your representatives and senators” enter your current address or your zip code, and in this search result you can find a member of Congress representing your district and you simply visit his official website.

On this website, navigate to services and then click on “Help with the federal agency” and on this webpage you can find detailed instructions to follow in order to get help with the federal agency from this office.

In the case of this office, all you have to do is to complete the online authorization form and once you’re done, print the filled form out, then sign it and mail or Fax it to his office.

Using city in California as an example, in the search results you can find a member of Congress representing a district. You will just go to his official website and on this website, navigate to “services” and click on “help with federal agencies” and once again you can see the protocol to follow to get help with the federal agency using this office.

In the case of this office, all you have to do is to complete and sign the consent form and then scan and email the form to the email address located at the top.

Sample letter to congressman asking for immigration assistance

Sample letter to congressman asking for immigration assistance

  • House.gov

You can also seek for congressional assistance by finding the name and contact information of the congressional representative from this website – www.house.gov. At the top right section of the screen there should be a prompt that says “Enter your zip code.” Once your zip code is entered, your representative’s name and contact information should appear.

Their contact information is usually an email address and a phone number, although email is generally preferred.

Frequently Ask Question About Contacting Congressman To Speed Up USCIS Immigration Application

Can Congressman speed up immigration?

The immigration process is long and requires patience. If you are waiting for a decision on your application and it has taken longer than the USCIS estimated processing time or if you have a strong reason to ask for expedited processing of your case, your U.S. congressional representative might be able to help.

How can a congressman raise expedite request?

They can do so since they have authority over federal agencies like USCIS. Once the congressional representative has been contacted and the situation is explained, the congressman would inform you of any form or document that needs to be submitted.

If an expedite request is being filed through the congressional office, the documents proving the reasons for expedited processing will be required by the congressional office. However, there is no guarantee a request for expedited service will be approved, even if the request meets the needed criteria.

How can a congressman help with immigration?

Once you call the right office, you can let the staff member know that you are in their district and that you need assistance with immigration processing, and ask for the best person to speak to. For privacy reasons, a congressional office cannot contact a federal agency on your behalf without your permission.

How long does it take for USCIS to respond to Congressman?

Typically, an agency responds within 30 days to a congressional inquiry.

Can Senators help immigration?

Whether you are looking for assistance with immigrant or non-immigrant visas, citizenship, asylum or refugee cases, or would like to check the status of your application, Senators can assist you in answering your questions.

These are the most effective ways to speed up your case with USCIS.

Make sure to share this guide with someone you know who is experiencing delays with USCIS. Thank you for reading.

DISCLAIMER: This guide and content is designed for general information only and is NOT legal advice. The information presented in this guide should not be construed to be formal legal advice. If you need legal advice, you may contact a licensed attorney.

BEST Tips to Speed Up Your Immigration Case with USCIS For Free

In this guide, you will learn the best tips to speed up your immigration case with USCIS, with guided examples, and the best part is that there are no fees involved.

So if you’re currently dealing with delays with USCIS, make sure to read this guide through to the end, as this guide will be of tremendous value to you. Tips to speed up your immigration case with USCIS.

USCIS case tracking

You’ve done an excellent job of submitting a completed application to USCS or responded timely to any request for evidence you may have received, and yet your case status is still stuck.

You’re constantly checking the USCIS case tracking tool every day or multiple times a day, hoping to see an update, and you are anxiously reading forms to find out if others are experiencing delays similar to yours.

You keep calling the USCIS customer service only to get a generic response. After waiting for an hour, you’re left in desperate thinking you just have to keep waiting for USCIS to get it together.

Well, this guide will give you in details the most effective things you can do to get USCIS to take action on your case. Most of these are rarely talked about.

How to Speed Up Your Immigration Case with USCIS For Free

Below are best tips to speed up your immigration case with USCIS:

The very first thing to do is to make sure that you’ve checked the current processing time of the USCIS Service Center where you filed your petition.

To get more detail about that, Check this previous post titled “4 Best Ways to Track Your Case Status with USCIS”

So once you have determined that your case falls outside the current processing time of the USCIS Service Center, the first thing you want to do is to submit an online inquiry to USCIS.

  • USCIS Case Inquiry

On the homepage of the USCIS website (i.e USCIS.Gov), Click on “Tools”; on the topics, click on “USCIS Tools and Resources”; on the “self-service Tools”, click on “e-Request” and on the case inquiry, click on “Case Outside Normal Processing Time.”

Case Information Section

For example, let’s say you file the form I-765 to USCIS as a qualified F1 academic student, and as you scroll to the bottom of this page, on the form number, you’re going to select “I-765” and your “form subtype” will be a “qualified F1 academic student.”

How to Speed Up Your Immigration Case with USCIS For Free

Here you’re going to type in your “receipt number” as contained on your form I-797C and also type in the “Date your case was filed with USCIS.”

Applicant or petition information section

How to Speed Up Your Immigration Case with USCIS For Free

In the applicant or petition information section, you just type in your “First Name”, your “Last Name” and your “Date of Birth”. And if you happen to have an “alien registration number”, type that into this section as well.

Mailing Address

How to Speed Up Your Immigration Case with USCIS For Free

Fill up your mailing address in the box provided.

Last action taken on your case Section

How to Speed Up Your Immigration Case with USCIS For Free

For example, if you receive the request for evidence from USCIS, make that comment in this section. Fill up your email address.

Filed By

If you file this petition by yourself, then you want to select “Applicant or petitioner” for this section.

USCIS Case Inquiry

And when you’re done, click Submit.

What’s most effective about sending an online inquiry to USCIS is that you get more detailed description on the status of the case, compared to what you can find on the USCIS Case Tracking tool.

Once you’ve submitted an online inquiry to USCIS, you should expect to receive an email describing in detail the current status of your case. That email might also contain the next steps to be taken by USCIS towards processing your case.

  • Expedite Request

The next thing you can do is to submit an expedited request to USCIS, and here’s exactly how to do that;

From the home page of the USCIS website at USCIS.Gov, click on “Forms” and on this webpage, on the left hand side, on the forms section, Select “Filing Guidance”.

On the Filing guidance section, click on “Expedite request”, and on this webpage you’re going to find detailed instructions on how to make an expedite request with USCIS.

It is critically important to note that whenever you make any claims in your expedite request, you need to be able to back this up with support and proof.

For example, if you make claims about financial hardships, then you might want to provide documentation such as your bank statements or eviction notices to back up those claims.

The next option is to contact the Congressman representing your district. When you hear the word congressman, you might be saying “but I’m not a U.S citizen”, “How am I supposed to contact the congressman?” What you need to understand is that a congressman is there to represent everyone who lives in your district, be that foreign nationals or U.S citizens.

Generally, when you contact the office of your congressman, you’re going to be asking them to help you speed up your case with USCIS. Given that USCIS is a U.S federal agency that falls under the direct oversight of Congress, your Congressman has a lot of leverage to get USCIS to take action on your case.

In many cases, the process of contacting your congressman to help speed up your case with USCIS could be as easy as visiting your congressman’s website. Let’s take a look at some examples of how to do this.

The first thing you will do is to determine the congressman who represents your district.

To do that, visit www.govtrack.us

On the homepage of this website, click on “Legislators” and select “Members of Congress” and on this webpage under “Find your representatives and senators” enter your current address or your zip code, and in this search result you can find a member of Congress representing your district and you simply visit his official website.

On this website, navigate to services and then click on “Help with the federal agency” and on this webpage you can find detailed instructions to follow in order to get help with the federal agency from this office.

In the case of this office, all you have to do is to complete the online authorization form and once you’re done, print the filled form out, then sign it and mail or Fax it to his office.

Using city in California as an example, in the search results you can find a member of Congress representing a district. You will just go to his official website and on this website, navigate to “services” and click on “help with federal agencies” and once again you can see the protocol to follow to get help with the federal agency using this office.

In the case of this office, all you have to do is to complete and sign the consent form and then scan and email the form to the email address located at the top.

These are the most effective ways and best tips to speed up your immigration case with USCIS.

Make sure to share this guide with someone you know who is experiencing delays with USCIS. Thank you for reading.

DISCLAIMER: This guide and content is designed for general information only and is NOT legal advice. The information presented in this guide should not be construed to be formal legal advice. If you need legal advice, you may contact a licensed attorney.

4 BEST Ways to Track/Check Your USCIS Case Status Online

How to Track/Check Your USCIS Case Status Online: The process of obtaining your immigration document from USCIS is often complex, with several challenges. In order to ensure your pending case moves as quickly as possible, you need to stay up to date on your case status. If you’d like to track/check your USCIS case status online, there are several inquiry options available to you, including email, telephone, direct mail, apps, or in-person at your local processing center.

In this post, you will learn several options to effectively track your case with USCIS. You will also learn how to check the processing time for the USCIS Service Center where your case was filed.

4 BEST Ways of Tracking Your Case Status online with USCIS

Below are 4 BEST ways to Track Your Case Status online with USCIS.

  1. USCIS Online Case Tracking

The first and simplest way you can track the status of your case is by going online to the USCIS Case Status web page. In order to track your case, you need to enter the receipt number found at the top of your form, I-797C.

What is the USCIS receipt number?

A Receipt Number is a 13-character code that is used to identify and track applications and petitions for immigration benefits. It can be found on the I-797, Notice of Action

  1. Calling USCIS Customer Service

The second way to track the status of your case is by contacting USCIS over the phone. You can do this by calling USCIS Customer Service. One of the benefits of this method is that you can find out the status of your case without having your receipt number.

However, to do this, you need to talk to a USCIS agent and sometimes getting a hold of these agents could take as long as 2 hours.

  1. Email USCIS Service Center

The third way you could track the status of your case is by sending an email inquiry to the USCIS Service Center where your application was filed with the following information:

  • full name
  • birth date
  • alien number (if applicable)
  • date your application/petition was filed
  • location your petition/application was filed
  • receipt number (if you’ve received one)

If possible, include a copy of your receipt with your inquiry letter to facilitate the case status update process.

  1. Use Free 3rd Party Apps

The fourth and final way you can track your key status is by downloading the free app from the Google Play Store or the App Store.

USCIS Case Status Tracking APP

One of the benefits of this method is that you get an immediate notification whenever there’s a change to your pending case.

How to Check Your USCIS Case Status by in Person

Lastly, you can inquire in-person about the status of your USCIS case. This will require you to make an appointment with your local processing center. Appointments can be made regardless of whether you are currently in the U.S. or not. To schedule an appointment, visit the USCIS appointment scheduling page.

Who Can Check Their USCIS Case Status

If you have submitted a visa application, extension, transfer or a green card application to USCIS, you will be able to check your USCIS case status online. USCIS also offers case status tracking for:

  • Form I-140
  • Form I-485
  • Form I-765
  • Adjustment of Status (AoS)
  • Advance Parole
  • Employment Authorization Documents (EAD)
  • Citizenship

The types of applications you can check in the USCIS website include:

  • H1-B Applications
  • Green Card Applications

How to Check the Current USCIS Processing Time

You might also want to determine the current processing time of the USCIS Service Center where you filed your application. To do this, you want to go to USCIS.gov and on the homepage you want to click on Tools and on the topics you want to select USCIS Tools and Resources, and on the self-service Tools, you want to select case processing times.

To check the processing time for a specific form, you need to know:

  • Petition/Form type
  • Processing center
  • Classification or basis of filing

For example, if we fought an I-765 application to the Texas Service Center.

On the forms, you select I-765 and on the field Office, you Select Texas Service Center and click on Get processing Time.

And now it’s going to display a table with an estimated time range and different form types received on different dates. See table below

USCIS Processing Times

Here’s how to interpret this table above.

The first number indicates how long it takes USCIS to process 50% of all the files received on April 22, 2020.

The second number indicates how long it takes USCIS to process 93% of all the files received on April 22, 2020.

For example if you take a look at the first row it shows that it takes 1.5 months for USCIS to process 50% of all the files petition for F1 students and five months to process 93% of all the petitions filed by F1 students on April 22 of 2020.

USCIS Case Status FAQ

Can I check my USCIS Case Status without a Receipt?

No, you cannot check your case status without a Receipt. If you do not have a Receipt, the status you are looking for will not be found online.

What is the USCIS receipt number?

A Receipt Number is a 13-character code that is used to identify and track applications and petitions for immigration benefits. It can be found on the I-797, Notice of Action

When will my USCIS case status be approved?

Different cases and forms take different amounts of time to process. A case can be processed in a few months or after more than a year, depending on the case. To look up the current processing time for a particular form, use the USCIS Check Case Processing Times page.

If you found this article very helpful make sure to like it and share it. Thank you for reading this post.

DISCLAIMER: This post and content is designed for general information only and is NOT legal advice. The information presented in this post should not be construed to be formal legal advice. If you need legal advice, you may contact a licensed attorney.

error: Content is protected !!